Your PowerPoint slides are packed with valuable information, but their true potential is often locked away in a static file. Converting your PPT to video is the key to unlocking that potential. It’s a smart, modern strategy to transform static slides into dynamic, engaging content that grabs attention and makes your message stick.
Why Should You Turn Your PowerPoint Into a Video?
Let's be honest: a standard PowerPoint presentation has a very short shelf life. Once the meeting or webinar is over, the content you worked so hard to create often gets buried in a forgotten folder, never to be seen again.
Converting that same presentation into a video changes everything. It gives your ideas a second life, making them accessible, reusable, and far more appealing to today's video-first audience.
Video is no longer just a "nice-to-have" marketing tool; it's central to how we learn, communicate, and sell. The latest video marketing statistics show that 91% of businesses use video as a primary marketing tool. The reason is simple: it works. Companies that embrace video marketing see their revenue grow 49% faster than those that don't.
The Strategic Advantages of Video Content
Turning your slides into a video is more than just a file conversion. It’s a strategic move to repurpose your work for maximum impact and get more mileage out of every piece of content you create.
Here’s why it’s such a powerful strategy:
- Boosts Audience Engagement: Video combines visuals, sound, and motion to create an immersive experience. This dynamic format is simply better at holding attention than static text and images.
- Improves Information Retention: People are far more likely to remember a message they saw in a video. The combination of audio and visual cues helps complex ideas click and makes them easier to recall.
- Expands Your Reach: A video can be shared anywhere—on social media, embedded in a blog post, sent in an email, or featured on your website. This flexibility allows you to reach a much wider audience than a single slide deck ever could.
Two Main Paths to Convert Your PPT to Video
So, how do you actually do it? There are two primary methods for converting your PPT to video, and your choice depends on your goals, timeline, and resources.
| Method | Best For | Key Features | Effort Level |
|---|---|---|---|
| Native PowerPoint Tools | Detailed control, personal narration, and precise slide timings. Great for training and formal presentations. | Manual recording, timing adjustments, direct export from PowerPoint. | Medium-High |
| AI-Powered Platforms | Speed, automation, and professional features like avatars and voice cloning. Ideal for marketing and social media. | Automatic content repurposing, AI voiceovers, subtitles, and branded templates. | Low |
The first path involves using the reliable, built-in tools that PowerPoint already provides. This manual route gives you complete control and is perfect for adding your own narration and setting precise slide timings.
The second path is all about speed and advanced features, leveraging AI-powered platforms like LunaBloom AI. These tools automate the heavy lifting, transforming your slides into a polished video with features like AI avatars and voiceovers in a fraction of the time.
We'll walk through both methods to help you choose the right one for your next project.
How to Convert a PPT to Video Using PowerPoint's Built-In Tools
You don't always need expensive software to turn a presentation into a video. The best tool is often the one you already have, and PowerPoint includes a surprisingly powerful set of features for this exact purpose. Using the built-in function gives you direct, hands-on control over the final product.
This approach is perfect when you need to fine-tune every detail—from the exact timing of an animation to the tone of your voiceover. It’s the ideal method for creating detailed training videos, in-depth lectures, or any business presentation where precision and a personal touch are essential.
Step 1: Record Your Narration and Timings
A great video presentation relies on clear, well-paced narration. PowerPoint lets you record your voiceover one slide at a time, so you can speak naturally without feeling rushed. This is far less stressful than trying to nail a perfect, continuous audio track in one take.
If you mess up on a slide, you don't have to start over. Just re-record the audio for that single slide. This granular control is a huge time-saver.
You can also record your slide and animation timings. This means you can rehearse your presentation, clicking through each element exactly as you would in a live setting. PowerPoint remembers these timings, ensuring the final video plays back perfectly.
Here’s how to do it:
- Go to the "Record" tab in the PowerPoint ribbon.
- Choose "From Beginning" or "From Current Slide" to open the recording studio.
- Use the on-screen controls to record your voice and advance through your slides and animations at your own pace.
- PowerPoint automatically saves the audio and timings with your presentation file.
Step 2: Choose Your Export Settings
Once your narration and timings are set, the next step is to export the video file. The settings you choose here will directly impact the video's quality, file size, and compatibility.
Think of it like choosing the right shipping box. A massive 4K video is great for a conference screen, but it's overkill (and a pain to download) for an email attachment.
Which Resolution Should You Choose?
PowerPoint offers several resolution options. The right choice depends on where your audience will watch the video.
- Ultra HD (4K): Use this for the absolute best quality, ideal for large, high-resolution screens. Be prepared for a very large file size and longer export time.
- Full HD (1080p): This is the gold standard for most online use, including YouTube, Vimeo, or your company website. It delivers crisp, clear video without creating an enormous file.
- HD (720p): A solid choice if you need a smaller file for easier sharing via email or on platforms where bandwidth might be an issue.
- Standard (480p): Only use this if file size is your absolute top priority, as the visual quality is noticeably lower.
For most business, marketing, and training purposes, 1080p offers the perfect balance of quality and practical file size.
Should You Choose MP4 or WMV?
PowerPoint typically offers two video formats: MP4 and WMV. The decision here is straightforward.
| Feature | MP4 (MPEG-4) | WMV (Windows Media Video) |
|---|---|---|
| Compatibility | Excellent: Plays on virtually every device and platform (Mac, Windows, iOS, Android, web). | Limited: Mainly works on Windows systems. May not play on Macs or mobile devices without extra software. |
| Compression | High Quality: Balances sharp visuals with a reasonable file size effectively. | Good Quality: Often results in larger files for the same quality compared to MP4. |
| Recommendation | The universal choice. Perfect for almost any situation. | Only use if you know your entire audience is on Windows machines. |
Unless you have a very specific, Windows-only reason, always choose MP4. It’s the most versatile and widely supported video format available today.
Step 3: Add Closed Captions for Accessibility
Making your video accessible is crucial for reaching your entire audience. Closed captions ensure that people who are deaf or hard of hearing can understand your content. They also help anyone watching in a noisy environment or with the sound off (like most people scrolling on social media).
PowerPoint allows you to add captions by importing a WebVTT file (.vtt). You can create these files with a simple text editor or an online transcription service. The file contains your narration script with timestamps that tell the video player when to display each line of text.
To add your caption file:
- Click on the video element on your PowerPoint slide.
- Navigate to the "Playback" tab in the ribbon.
- Select "Insert Captions" and upload your WebVTT file.
This small extra step dramatically improves the user experience and makes your content more inclusive.
How to Use AI to Convert Slides into Dynamic Videos
While PowerPoint’s built-in tools offer control, the process can be slow and tedious. Imagine you need to turn a dense report into a quick, polished video summary for your team. Doing it manually could take hours. With AI, you can do it in minutes.
This isn't just about a simple PPT to video conversion. AI platforms act as content transformation engines. They intelligently repurpose your slides into a completely new and dynamic format, handling the heavy lifting so you can focus on your message.
From Static Slides to an Automated Script
The first step in an AI workflow is often the most magical. Instead of you writing a script and timing it to each slide, the AI analyzes the text and key points from your PowerPoint file and generates a script for you.
For example, a marketing manager can upload a campaign recap presentation, and the AI will instantly produce a coherent, natural-sounding script. A task that used to take hours is now done in moments.
The best part? The generated script is fully editable. You can easily refine it to ensure the final narration matches your desired tone, giving you the perfect blend of machine efficiency and human creativity.
Bringing Content to Life with AI Voices and Avatars
Once your script is ready, it's time to give it a voice and a face. This is where AI truly shines.
Modern AI tools offer advanced voice cloning that can create a remarkably human-like narration from your text. You can choose from a library of professional voices or even clone your own for a personal touch. This eliminates the need for expensive recording equipment and the hassle of re-recording lines.
To boost engagement even further, you can add a professional AI avatar to present your material. These digital presenters can gesture and speak, adding a human element to your video without requiring a camera, studio, or on-screen talent.
- For a corporate training video: An AI avatar can deliver clear, consistent instruction across an entire series of modules.
- For a social media ad: A dynamic avatar can grab attention instantly, running through key product features in a concise and engaging way.
Adding Final Polish with Automated Features
A great video is more than just visuals and a voiceover. AI platforms automate the finishing touches that often consume the most time in traditional video editing.
Synchronized subtitles are usually generated automatically. This is a massive win for accessibility and engagement, especially since so many people watch videos with the sound off. The AI ensures the captions are perfectly timed to the narration.
In addition, these platforms make it easy to add other key elements:
- Background Music: Choose from libraries of royalty-free music to set the right mood.
- Branding: Add your company’s logo, colors, and fonts for a consistent brand identity.
- Supplementary Visuals: The AI can even suggest relevant stock photos or video clips to add more visual interest to your presentation.
This level of automation drastically cuts down production time. This diagram shows the core steps in a typical conversion process.
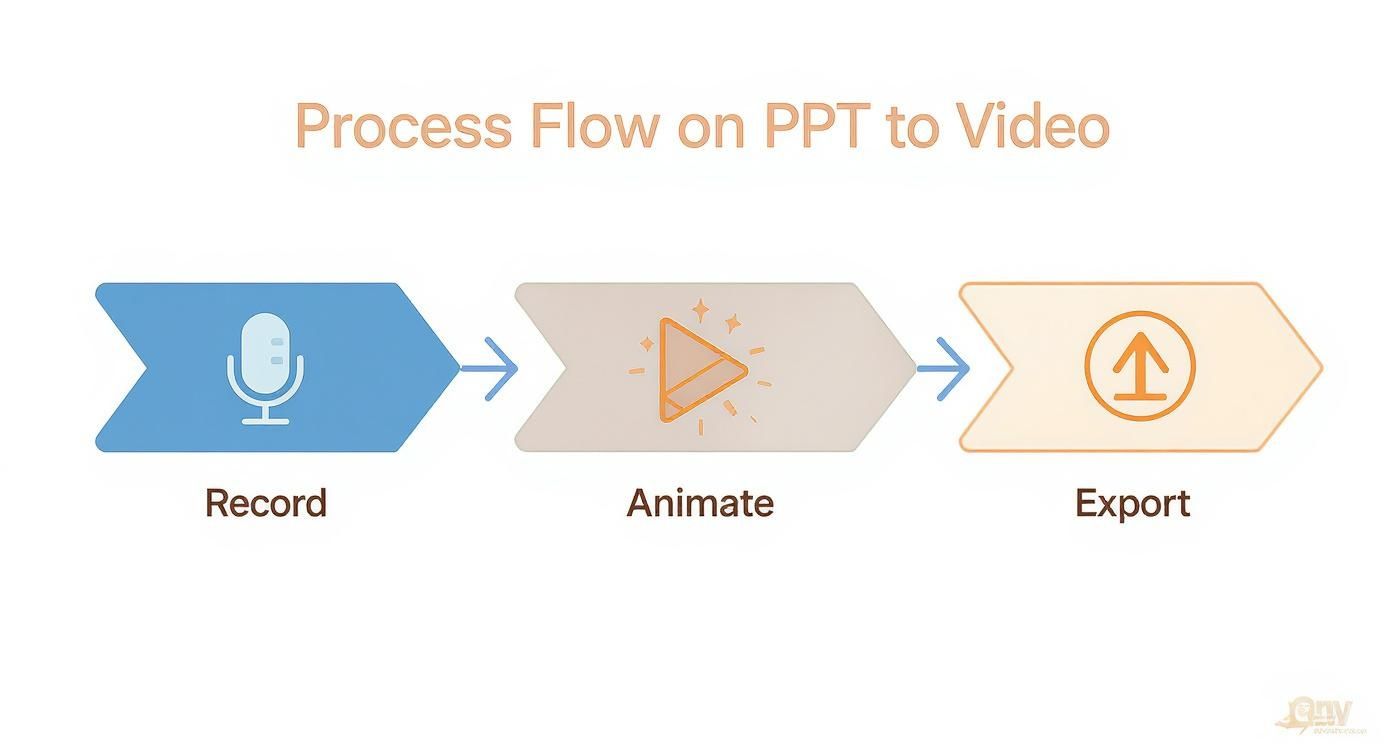
The journey from your initial idea to a final, polished video becomes a single, smooth workflow.
A Smarter Way to Create Video Content
Using an AI-powered platform like LunaBloom AI fundamentally changes your approach to video creation. You're not just converting a file; you're intelligently repurposing existing content into a more powerful medium. To get even more out of this process, learn how to create presentations with AI effectively from the start.
By automating the most tedious parts of video production—scripting, narration, and editing—these tools empower anyone to create professional-grade videos quickly and consistently.
Native PowerPoint vs. AI Conversion: Which is Right for You?
https://www.youtube.com/embed/xE2xMcus8b0
So, when it's time to turn your PPT into a video, which path should you take? Should you stick with the familiar built-in PowerPoint tools, or should you leverage the speed and power of an AI platform? The best answer depends on your specific project, timeline, budget, and desired outcome.
This isn’t about which method is objectively "better." It's about matching the right tool to the right job.
When to Use PowerPoint's Native Tools
PowerPoint’s native export feature is your best option when you need total control and a personal touch. This manual approach is perfect for creating detailed, narration-led videos when you have the time to fine-tune every slide.
This method is ideal for:
- Internal Training Modules: Your own voice adds authenticity and clarity when explaining complex company processes.
- Academic Lectures: You can perfectly time your explanations to complex charts and animations, ensuring students follow along.
- Formal Business Updates: Recording your own voice adds authority and personal accountability when presenting reports to stakeholders.
If the presenter's voice and precise timing are critical to the video's success, the manual route is a solid, dependable choice.
When to Use an AI Conversion Tool
AI-powered tools like LunaBloom AI are built for speed, scale, and a professional finish without the manual effort. This is the best choice when you need a high-quality video fast, especially for external audiences where first impressions matter.
AI is the clear winner for:
- Marketing and Social Media Content: Need a slick, engaging video for a new campaign? AI can generate a script, add a dynamic avatar, and drop in music in minutes.
- Quick Content Repurposing: Instantly turn a dense webinar deck into short, shareable clips for LinkedIn or Instagram.
- Multi-Language Presentations: AI platforms can generate voiceovers in dozens of languages, making it easy to create content for a global audience.
Turning presentations into videos is a major trend, and AI is shaping video production by making it faster and more accessible than ever before.
Feature Showdown: PowerPoint vs. AI
To make the decision even clearer, here’s a side-by-side comparison of the two methods.
| Feature | Native PowerPoint | LunaBloom AI | Best For… |
|---|---|---|---|
| Time to Create | Hours; requires manual recording and timing for each slide. | Minutes; AI automates scripting, voiceover, and syncing. | Speed |
| Visual Polish | Limited to PowerPoint's built-in animations and templates. | Professional avatars, stock footage, and branded templates. | Visual Appeal |
| Audio Options | Manual user narration only. Quality depends on your microphone. | AI voice library, voice cloning, and royalty-free music. | Flexibility |
| Ideal Use Case | Detailed internal training and academic lectures. | Marketing, social media, and scalable content creation. | Use-Case Fit |
Ultimately, your goal determines the best path. For a straightforward training video where your personal voice is key, stick with PowerPoint. For a polished marketing video that needs to go live ASAP, AI conversion is the smarter, more efficient choice.
Pro Tips for a Polished Presentation Video
Exporting your presentation as a video is a huge step, but the work isn't over yet. The difference between a good video and a great one lies in the final polish. These professional touches will make your content stand out.
Whether you used PowerPoint’s exporter or an AI tool, a little post-production effort goes a long way.
Choose the Right Soundtrack
Music is a powerful tool for setting the mood and keeping viewers engaged. The right background track can inject energy into a marketing video or create a focused tone for a training module.
When selecting a soundtrack, choose something that complements your message without overpowering it. Instrumental tracks from royalty-free music sites are often a great choice. Always check the volume levels to ensure your narration remains clear and easy to hear.
Refine Your Video with Simple Edits
You don’t need to be a professional video editor to improve your content. A few basic edits can make your video look far more polished. If you're new to post-production, a good guide on video editing for beginners can help you learn the core skills.
Here are a few simple edits that make a big difference:
- Trim Awkward Pauses: Cut out any dead air at the beginning or end of your video.
- Add a Branded Intro and Outro: A quick intro with your logo sets a professional tone, while an outro with your contact information or a call-to-action provides a clean finish.
- Insert B-Roll: If a slide remains on screen for a long time, consider adding relevant stock footage or images to maintain visual interest.
Include a Compelling Call-to-Action
Every video should have a purpose. What do you want your audience to do after watching? A clear call-to-action (CTA) provides that crucial next step.
Be specific and actionable. Instead of a vague "visit our website," try a more direct "Download your free guide at ourwebsite.com/guide."
Your CTA should be both visual (text on the screen) and verbal (mentioned in the narration) in the final few seconds of your video to maximize its impact.
Optimize for Different Platforms
Where you share your video matters. A video formatted for a wide YouTube screen will look awkward in a vertical Instagram Story. Customizing your video for each platform is essential for maximizing its reach and effectiveness.
- YouTube: A compelling thumbnail is crucial for getting clicks. Use a 16:9 aspect ratio and enable captions.
- Instagram & TikTok: Vertical video (9:16 aspect ratio) is king. Keep it short, and make sure your key message appears in the first three seconds.
- LinkedIn: Many users watch videos with the sound off, so burned-in captions are essential. A 1:1 square format often performs well in the feed.
Solving Common PPT to Video Problems
Even with the best tools, converting a ppt to video can sometimes lead to frustrating issues. Here’s how to troubleshoot the most common problems so you can get back on track quickly.
How to Fix Audio and Video Sync Issues
One of the most jarring problems is when your audio narration doesn't align with your visuals. This is often caused by processing lag during export, especially on older computers or with complex presentations.
Here’s how to fix it:
- Close Other Programs: Free up your computer's memory and processing power by closing all unnecessary applications before exporting.
- Use a Simpler Audio Format: If you imported a high-quality audio file, try converting it to a standard MP3 before adding it to your presentation.
- Export in Segments: For long presentations, break them into smaller parts, export them as individual videos, and then merge them in a video editor.
What to Do When Animations Disappear or Look Glitchy
If your carefully crafted animations are missing or look jerky in the final video, it's likely because the animation type isn't fully supported by the video encoder.
Keep animations simple for video exports. Stick to reliable choices like "Fade," "Appear," or "Wipe," as these translate more smoothly into video format.
If you must use a complex animation, the best workaround is to use a screen recording tool. Play your slideshow in presenter mode and record your screen as you click through the animations manually. This method captures exactly what you see on screen.
How to Deal with Large Video File Sizes
If your final video file is too large to email or upload, it's likely due to exporting at an unnecessarily high resolution.
Here’s how to reduce the file size without sacrificing too much quality:
- Choose the Right Resolution: For most internal and online uses, 1080p is sufficient. 4K is often overkill and will dramatically increase the file size.
- Compress Your Media: Before exporting, use PowerPoint’s built-in "Compress Media" feature (under File > Info) to optimize any embedded audio and video files.
- Use a Video Compressor: If the file is still too large, use a free online video compression tool to reduce its size further with minimal visible quality loss.
Final Thoughts: It's Time to Turn Your Slides into Stories
Transforming a static PPT into a dynamic video is one of the smartest ways to breathe new life into your content. It makes your message more engaging, memorable, and shareable, unlocking its potential to reach a much wider audience.
Whether you choose the hands-on control of PowerPoint’s native tools or the speed and professional polish of an AI platform, the goal is the same: to create valuable content that connects with your audience. By following the steps and tips in this guide, you have everything you need to start converting your presentations into powerful videos today.
Ready to turn your slides into stunning videos without the grind? See how easy video creation can be with a free LunaBloom AI trial.