Let’s face it: your meticulously crafted PowerPoint slides deserve more than to be an email attachment that gets ignored. Turning them into a video breathes new life into your message, transforming it into something people actually want to watch and share. It’s the difference between a static document and a dynamic story that works for you long after the presentation is over.
Ready to make the switch? This guide covers everything you need to know.
Why Turning PowerPoint Into Video Is a Smart Move
We’ve all been there—sending a deck over and hoping the recipient “gets it.” But without your voice and timing, the context is often lost. Converting that PowerPoint into a video flips the script entirely. You’re no longer just sending slides; you’re delivering a complete, guided experience.
This one move immediately starts paying dividends for your content.
- Skyrocket Viewer Retention: Video just sticks in our brains better. People retain an incredible 95% of a message they watch in a video, compared to a measly 10% from reading text. That’s a game-changer for any training or marketing material.
- Massively Expand Your Reach: You can’t just upload a .pptx file to YouTube or LinkedIn. But a video? That’s prime content for social feeds, company intranets, and websites, putting your ideas in front of way more eyeballs.
- Create Evergreen Assets: A recorded presentation becomes a 24/7 workhorse. It can be a training module for new hires or a marketing video that generates leads while you sleep. People can watch it on their own time, without you needing to be there.
Unlock Greater Engagement
Turning slides into a video also gives you total control over the narrative. You can add your own voiceover, background music, and time your animations perfectly to emphasize key points. It ensures your audience follows the story exactly as you intended. Plus, video files are much harder to edit or alter than a standard presentation file, keeping your intellectual property safe.
This isn’t just a neat trick; it’s a major shift in how we communicate. The AI video creation market has ballooned to $10.29 billion, which tells you everything you need to know about where things are headed. Businesses are moving away from static slides because they see the results that engaging videos deliver. If you want to dive deeper, you can explore this trend in the ultimate PowerPoint to video guide.
Using The Built-In PowerPoint To Video Feature

Sometimes the best tool for the job is the one you already have. PowerPoint’s native ‘Export to Video’ function is a surprisingly powerful way to turn your slides into a shareable video file, no extra software needed. It’s the perfect solution for creating simple training modules, narrated summaries, or quick marketing videos.
This built-in tool is more robust than you might think. It lets you bake everything from your animations and slide transitions to a full voiceover directly into the final video. If you need to transform your PowerPoint into a video without a lot of fuss, this is absolutely where you should start.
Preparing Your Slides For Video
Before you hit that export button, a little prep work will save you a ton of headaches. Your slides are the storyboard for your video, so make sure your animations and transitions are clean and add to the story, rather than just distracting from it. What looks slick in a live presentation can feel jarring or rushed in a video.
Timing is everything. You need to control exactly how long each slide and animation appears on screen. The “Record Slide Show” feature is your best friend here. It lets you run through your presentation as if you were giving it live, and PowerPoint will save the timing of every single click. This creates a smooth, automated playback experience for your final video.
Recording Your Narration
This is where you bring your presentation to life. Using that same “Record Slide Show” tool, you can add a voiceover that guides your audience through the content, just like you would in person. A silent slide deck is just information; a narrated one is a story.
For the best results, keep these tips in mind:
- Find a Quiet Space: Nothing screams “amateur” faster than background noise. A small room with carpets and curtains is far better than a big, echoey office.
- Use a Decent Microphone: Your laptop’s built-in mic will work in a pinch, but an external USB microphone is a game-changer for audio quality. Trust us, clear audio is non-negotiable if you want people to actually watch.
- Speak Clearly and Pace Yourself: Talk a bit slower than you normally would. It makes your message easier to follow and gives your viewers a moment to process the visuals on each slide.
The screenshot below shows the “Export to Video” screen, which is the final stop in this process.
This is where you can choose your video quality and confirm whether you want to include the timings and narrations you just recorded.
Choosing The Right Export Settings
Once you’re happy with your recording, head over to File > Export > Create a Video. You’ll see a couple of important choices. The most critical one is video quality. For almost any professional use case, Full HD (1080p) is the sweet spot—it gives you great quality without creating a massive file. Ultra HD (4K) is an option for very detailed presentations, but be prepared for significantly larger file sizes and longer export times.
The real power of converting PowerPoint to video shows up in the ROI numbers, where 92% of marketers report positive returns and 87% have seen direct sales growth from video. You can learn more about these powerful statistics to see how this easy conversion can become a revenue booster.
When to Look Beyond PowerPoint: Screen Recording and Third-Party Tools
While PowerPoint’s built-in export is a decent starting point, you’ll eventually hit its limits. When you want to move past a simple narrated slideshow and turn your PowerPoint into a video that feels more dynamic and professional, it’s time to explore other options.
These tools become essential when your presentation needs more context than just slides. Let’s say you’re demonstrating a new software feature or need to pull up a live website to illustrate a point. PowerPoint’s native export just can’t do that. Screen recording is your answer.
Gaining Full Control With Screen Recording
Screen recording software like OBS Studio (a seriously powerful free tool) or Camtasia hands you the creative reins. Instead of just packaging up your slides, you’re capturing your entire screen in real-time as you present. This completely changes the game.
With a screen recorder, you can easily:
- Add a Personal Touch: Overlay a webcam feed of yourself in the corner. This little addition creates a massive personal connection with your audience, which is crucial for building trust in training videos or sales presentations.
- Show, Don’t Just Tell: Seamlessly switch between your slides and other applications. You can demo a piece of software, walk through a complex spreadsheet, or browse a live website, all within the same continuous video.
- Annotate on the Fly: Most screen recorders let you draw, highlight, or add text to your screen as you record. This is perfect for emphasizing key points and keeping your viewers locked in on what matters.
This approach shifts the video from a pre-packaged export to a live, guided tour. It’s the difference between sending someone a brochure and giving them a one-on-one walkthrough.
Using Dedicated Third-Party Converters
Another route is to use online, third-party video converters. These services are almost always cloud-based, meaning their servers do all the heavy lifting, which frees up your computer’s resources. The process is usually simple: you upload your .pptx file, tweak a few options, and wait for an email with a link to your finished video.
These converters are great for specific tasks, but there’s a trade-off to consider.
Potential Advantages:
- Advanced Features: Many offer unique templates, stock music libraries, and even automated voiceovers to spice up your presentation.
- Cloud Processing: Your computer won’t be bogged down for minutes (or even hours) while a large video renders.
- Ease of Use: They typically have dead-simple interfaces designed for quick and easy conversions.
Potential Disadvantages:
- Subscription Costs: The best features are almost always behind a paywall.
- Watermarks: Free versions will often slap a distracting watermark right on top of your final video.
- Less Customization: You generally give up fine-tuned control over timing and narration compared to a screen recorder.
Ultimately, deciding between these tools comes down to your project’s specific needs.
The AI-Powered Approach To Video Creation
While the built-in export and screen recording methods are solid, the next leap in turning a PowerPoint into video is already here, and it’s powered by AI. This isn’t just about simple conversion. We’re talking about full-scale video production that slashes the time and effort it takes to create something that looks truly professional.
Imagine uploading your slide deck and letting an intelligent system do all the heavy lifting. This is exactly what tools like LunaBloom AI are designed for, automating almost every step. You can go from static slides to a dynamic video with a lifelike presenter in minutes, not hours.
Automating The Entire Workflow
The real magic of AI is how it handles the most tedious parts of video creation. Instead of you spending an hour recording a script, the AI can generate one from the text on your slides. It can then add a realistic AI avatar to be your presenter, complete with natural gestures and expressions.
This technology also solves one of the biggest headaches in presentation videos: audio. It can clone your own voice for a perfectly personalized narration or generate a crisp, high-quality synthetic voiceover. Forget about doing multiple takes to get the audio just right—the AI nails it on the first try, every time.
This shift means that creating a high-quality video is no longer dependent on having expensive equipment or a dedicated production team. It democratizes video creation, making it accessible to anyone with a great presentation.
Expanding Your Reach Effortlessly
One of the most impressive features is the ability to break down language barriers instantly. AI platforms can automatically translate your video and create dubbed versions in dozens of languages, opening up your content to a global audience with just a few clicks. Not long ago, this was a complex and pricey process.
This flowchart gives you a quick visual guide on how to choose the right tool for the job.
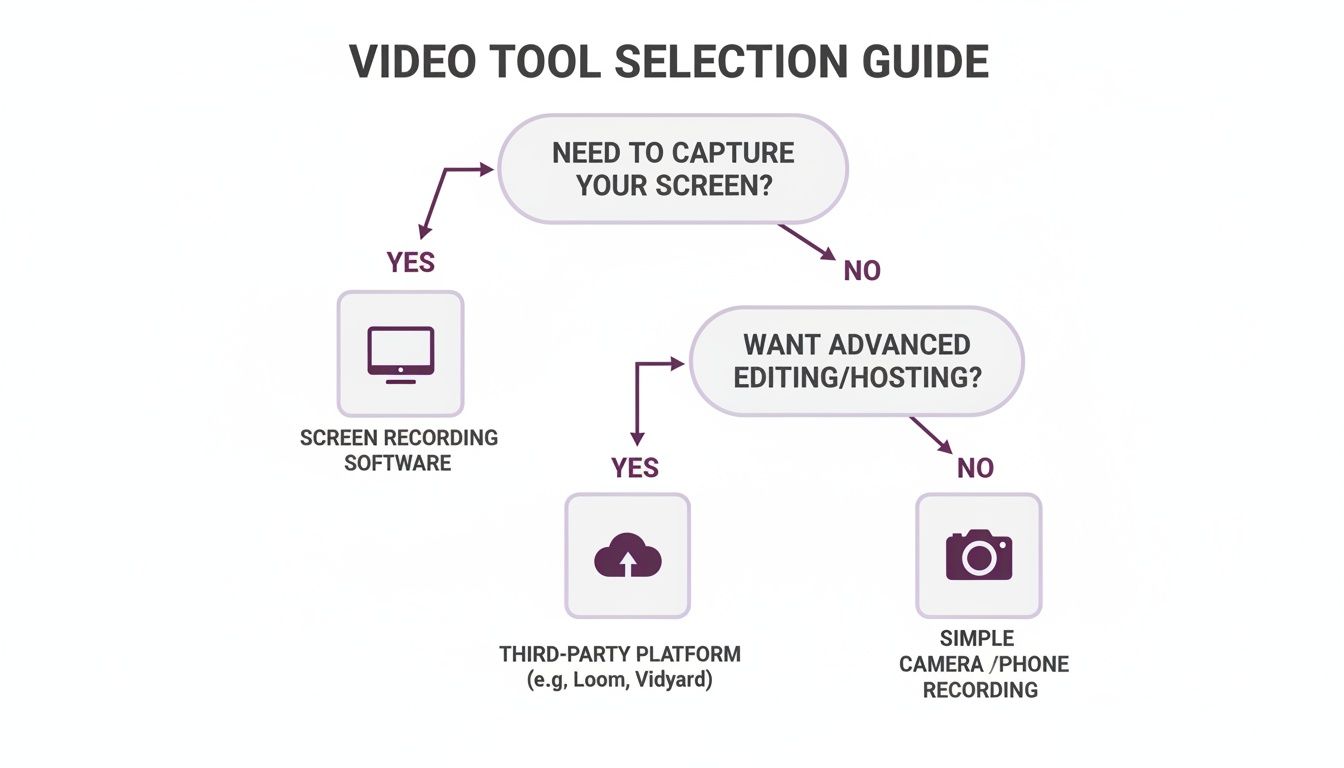
As you can see, AI-powered tools offer a clear path for anyone who wants maximum automation and advanced features like avatars and voice cloning without the steep learning curve.
Other automated features often include:
- Automatic Subtitle Generation: The AI listens to the narration and generates perfectly timed subtitles. This is a huge boost for accessibility and helps engage viewers watching with the sound off.
- Background Music Selection: It can analyze the tone of your presentation and suggest background music that fits the mood.
- Smart Editing: Some platforms can even suggest visual edits or animate key points on your slides to keep your audience hooked.
This automated workflow is a huge reason why video marketing is so dominant. With 89% of businesses using it as a core marketing tool, the demand for efficient production has skyrocketed. You can read Wyzowl’s full report to see just how integral video has become. By handling the technical details, AI frees you up to focus on what truly matters: your message.
Essential Tips For A Professional Video Finish

Getting a video file out of your presentation is a great start, but it’s not the finish line. The real magic happens when you turn that basic export into something polished and professional—a video people actually want to watch.
It’s all in the details. Let’s walk through the small but critical adjustments that will take your PowerPoint into video conversion from “good enough” to genuinely impressive.
Optimize Your Slides For The Screen
Here’s a hard truth: what looks great on a giant projector in a conference room often falls flat on a phone or laptop. You have to design for the screen your audience is actually using.
That means rethinking your entire visual approach for smaller displays.
- Bump Up Your Font Size: Text that seems perfectly readable during a live presentation can become a blurry mess on a mobile device. Go bigger and bolder than you think you need to.
- Crank Up the Contrast: Stick with high-contrast color combos. Dark text on a light background (or the reverse) is a classic for a reason—it’s clean, professional, and easy to read.
- Keep It Simple: One big idea per slide. That’s it. Avoid cramming your slides with text walls that force people to hit pause. Your narration should do the storytelling, not the text on the screen.
Master Your Audio And Pacing
You can have the most beautiful slides in the world, but if your audio is terrible, people will click away in seconds. Poor audio is the number one video killer.
Beyond just grabbing a decent microphone, pay close attention to the rhythm of your delivery. Speak clearly and at a measured pace. Don’t be afraid to leave intentional pauses after you make a key point. This gives your audience a moment to process what they’re seeing on the slide and hearing from you. Rushing feels anxious; a steady pace projects confidence.
A well-paced video feels like a confident conversation, not a frantic lecture. Give your ideas room to breathe, and your audience will stay with you until the very end.
Make Your Video Accessible With Captions
In today’s world, captions are non-negotiable. A huge chunk of social media videos are watched with the sound completely off. Without captions, your message is invisible to that entire audience.
Captions are also a cornerstone of accessibility, opening up your content to viewers who are deaf or hard of hearing. They’re a massive help for non-native speakers, too. While PowerPoint has a live subtitle feature, you’ll get far better results by adding them in a video editor or with an AI tool after the fact.
This final layer of polish is what separates the amateurs from the pros. By nailing these finishing touches, you create a video that doesn’t just get views, it makes a real impact.
From Slides to Stories: Your Next Step
We’ve walked through the best ways to turn your PowerPoint into a video. Whether you use the quick built-in export, take control with a screen recorder, or automate the entire process with AI, there’s a perfect method for your project.
But this is about more than just converting a file type. You’re making a fundamental shift from showing static slides to telling a dynamic story. A video brings your tone, timing, and personality to the forefront in a way a silent deck never could. It’s about creating a genuine connection with your audience.
The goal isn’t just to end up with a video file. It’s to build a communication asset that keeps working for you long after you’ve hit the export button. Now it’s your turn—pick a method and start transforming your static presentations into engaging videos that leave a lasting impression.
Common Questions About PowerPoint Videos
Once you start converting your PowerPoint decks into videos, you’ll probably run into a few questions. Getting these sorted out early will save you a ton of headaches and help you get a much better final product.
Let’s dive into the most common ones.
How Long Should My PowerPoint Video Be?
The answer hinges on your goal and where you’re posting the video. There’s no magic number, but here are some battle-tested guidelines.
- For social media platforms like LinkedIn, keep it under two minutes. People are scrolling fast, and you need to grab their attention immediately.
- For deeper content like training modules or webinar recordings, you have more room to breathe. But if you’re pushing past 15 minutes, you should seriously consider breaking it up. A series of shorter, focused videos is far more digestible than one long marathon session.
Can I Edit The Video After Exporting From PowerPoint?
Yes, and you probably should if you want it to look truly professional. When you export from PowerPoint, you get a standard video file (usually an MP4). That file can be dropped into any video editor you’re comfortable with.
You could use something free and simple like Clipchamp or go all-in with a pro tool like Adobe Premiere Pro. This is where you add the polish—things like a branded intro, background music, or splicing in live-action footage alongside your slides.
Will My Animations And Transitions Transfer To The Video?
Mostly, yes. PowerPoint does a surprisingly good job of keeping your animations and transitions intact when you export. The trick is to nail your timing when you use the “Record Slide Show” feature. That process is what locks in when every animation fires and how long each slide is displayed.
Pro Tip: Always do a quick watch-through of the final exported video. Every once in a while, a really complex, multi-layered animation might look a tiny bit different in the video than it did in presentation mode. A final check ensures no surprises.
Tired of the manual recording and editing grind? LunaBloom AI takes your presentation and instantly adds lifelike AI avatars, clones your voice for perfect narration, and adds subtitles automatically. Turn your static slides into engaging video content in minutes, not hours. See how LunaBloom AI can transform your workflow.