You don't need a perfect first drawing to learn how to make your own OC. You need a character who still looks, speaks, and acts like the same person in scene ten as in scene one. Build the decisions first, test them in small scenes, and save every version so the design doesn't drift when you move from a sketch to a comic, avatar, or video.
What an OC Is and What to Prepare First
300 virtual creators on YouTube generated more than 15 billion views in 2024, according to reporting on virtual creators. That scale shows why repeatable characters matter. Viewers return when they recognize someone instantly.
An original character, or OC, is a fictional person, creature, or persona you design and keep consistent across scenes, posts, or videos. A usable OC works like a small production kit: three parts must fit together.
- A recognizable look: silhouette, colors, and props that survive a small thumbnail.
- A repeatable performance: a way of speaking, standing, and reacting under pressure.
- A clear role: what the character does in a story, comic, roleplay, or channel.
Draw a striking fox mechanic on Monday. By Friday her coat color has changed, her personality has flipped from shy to brash, and nobody can tell what she wants. The drawing did not fail. The missing decisions did.
Before you start, write down a purpose (comic, roleplay, YouTube narrator, brand mascot, or avatar), a target format (static image, animated clip, or talking avatar), and a dated folder for versions and source files. Set aside about 60 minutes for a first pass. Work in this order: character bible, visual design, voice and movement, export files, originality checks, then a short test scene.
Build the Character Bible Before the Artwork
A character bible is a one-page set of decisions you check before every new drawing or script. It isn't a trivia sheet. Favorite food and star sign can wait until your character can make a believable choice on screen.
A Six-Step Bible You Can Finish Today
- Write a one-sentence premise. Name who they are, what they want, and what blocks them. "A courier wants to retire, but she owes a debt to a smuggler" gives you scenes. "A cool courier" doesn't.
- Pick three visible behaviors and one contradiction. Choose actions a viewer can see, such as blunt speech, loyalty to friends, and avoiding eye contact when lying. Add a clash, such as a careful planner who takes reckless bets.
- Set one goal and one opposing fear. A concrete goal creates movement. The fear explains why the character hesitates, lies, or chooses badly.
- Rate strengths and limits across six areas. The 2024 Dungeons and Dragons Basic Rules use Strength, Dexterity, Constitution, Intelligence, Wisdom, and Charisma, with a standard array of 15, 14, 13, 12, 10, and 8. Borrow the structure, not the game. Give your OC a few clear competencies, one average area, and at least one meaningful limitation.
- Name the eventual decision. Decide what hard choice they'll face later. That choice tells you which traits matter now.
- Add biography props and speech habits. Choose two or three costume details that carry history, plus two verbal habits, such as short sentences and calling everyone by surname.
Practical rule: If a bible entry can't change a line, pose, or decision in a scene, move it to a notes page.
If you're building a persona for chat or interactive stories, ExChat's guide to creating AI characters is a useful companion for turning these decisions into a consistent conversational character. Keep your own bible as the source of truth either way.
Character Bible Fields and What to Decide
| Field | What to decide | Example |
|---|---|---|
| Premise | One sentence: who, what they want, what blocks them | A courier who wants to retire but owes a debt to a smuggler |
| Core traits | Three behaviors you can show on screen | Blunt, loyal, avoids eye contact when lying |
| Contradiction | One trait that clashes with another | Careful planner who takes reckless bets |
| Goal and fear | What they chase and what they dread | Wants to open a bakery; fears losing their sister |
| Strengths and limits | Ratings across six areas, one average, one weak | Physical 15, social 10, planning 8 |
| Decision point | A choice they make later in the story | Tells the truth and loses the job |
| Props and costume | Two or three items that encode biography | Burned pocket watch, mismatched gloves |
| Speech pattern | Two verbal habits | Short sentences, calls people by their surname |
When every field is filled, you've got a decision system, not just a description. Test new artwork and dialogue against it before you add more lore.
Design a Readable Look Through Silhouette Tests
A strong look starts as a black shape, not a polished portrait. If viewers can't guess the character's role from the outline alone, details will only decorate the confusion.
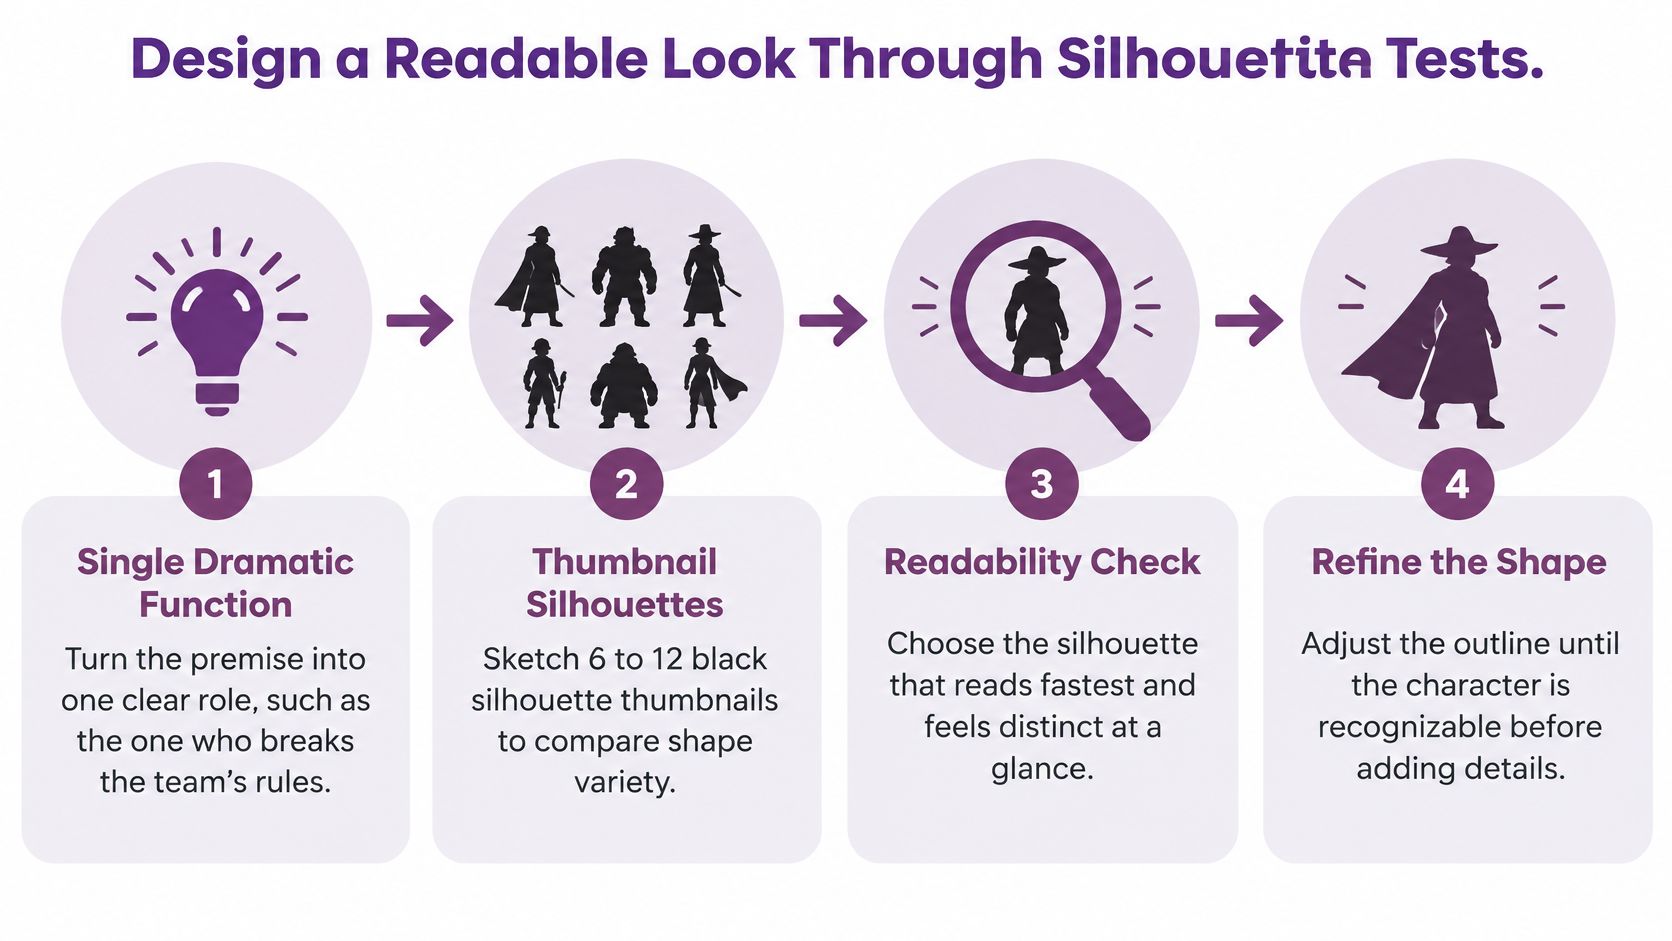
The four-part flow below keeps the test simple before you commit to color and costume.
Run the Validation Loop
- Turn the premise into one dramatic function. For example, "the teammate who breaks rules to protect people." That function should suggest posture, proportions, and props.
- Sketch 6 to 12 thumbnail silhouettes in black and white. Remove facial detail. Vary height, width, hair or head shape, clothing bulk, and carried objects.
- Show them to three to five fresh viewers. Ask each person to describe the role and personality without showing them the bible.
- Keep only the shapes with converging answers. If one viewer sees a healer, another sees a villain, and a third sees a robot, the silhouette isn't communicating yet.
- Limit shape language and color. Build from two or three basic shapes, such as round for warmth and angular for conflict. Set one main color, one accent, and one neutral so the palette stays repeatable.
- Build a model sheet before finished scenes. Include front, side, three-quarter, expression, hand or prop, and scale views. Add a clear line of action in poses so emotion reads through the body, not just the face.
Small visual details can act as shorthands for backstory, such as a repaired coat or an old badge. A study of shorthands in semi-realistic character design found they can improve storytelling, but its quantitative survey included 28 participants, so treat that result as directional rather than a universal success rate.
Choose a route that fits your skills: hand sketching, digital painting, or an AI image generator. Run the silhouette test first either way, and keep source files, references, and prompts in your dated folder. This test is also the cheapest way to catch a design that accidentally resembles someone else's character before you've invested hours in rendering.
Give Your OC a Voice and a Way to Move
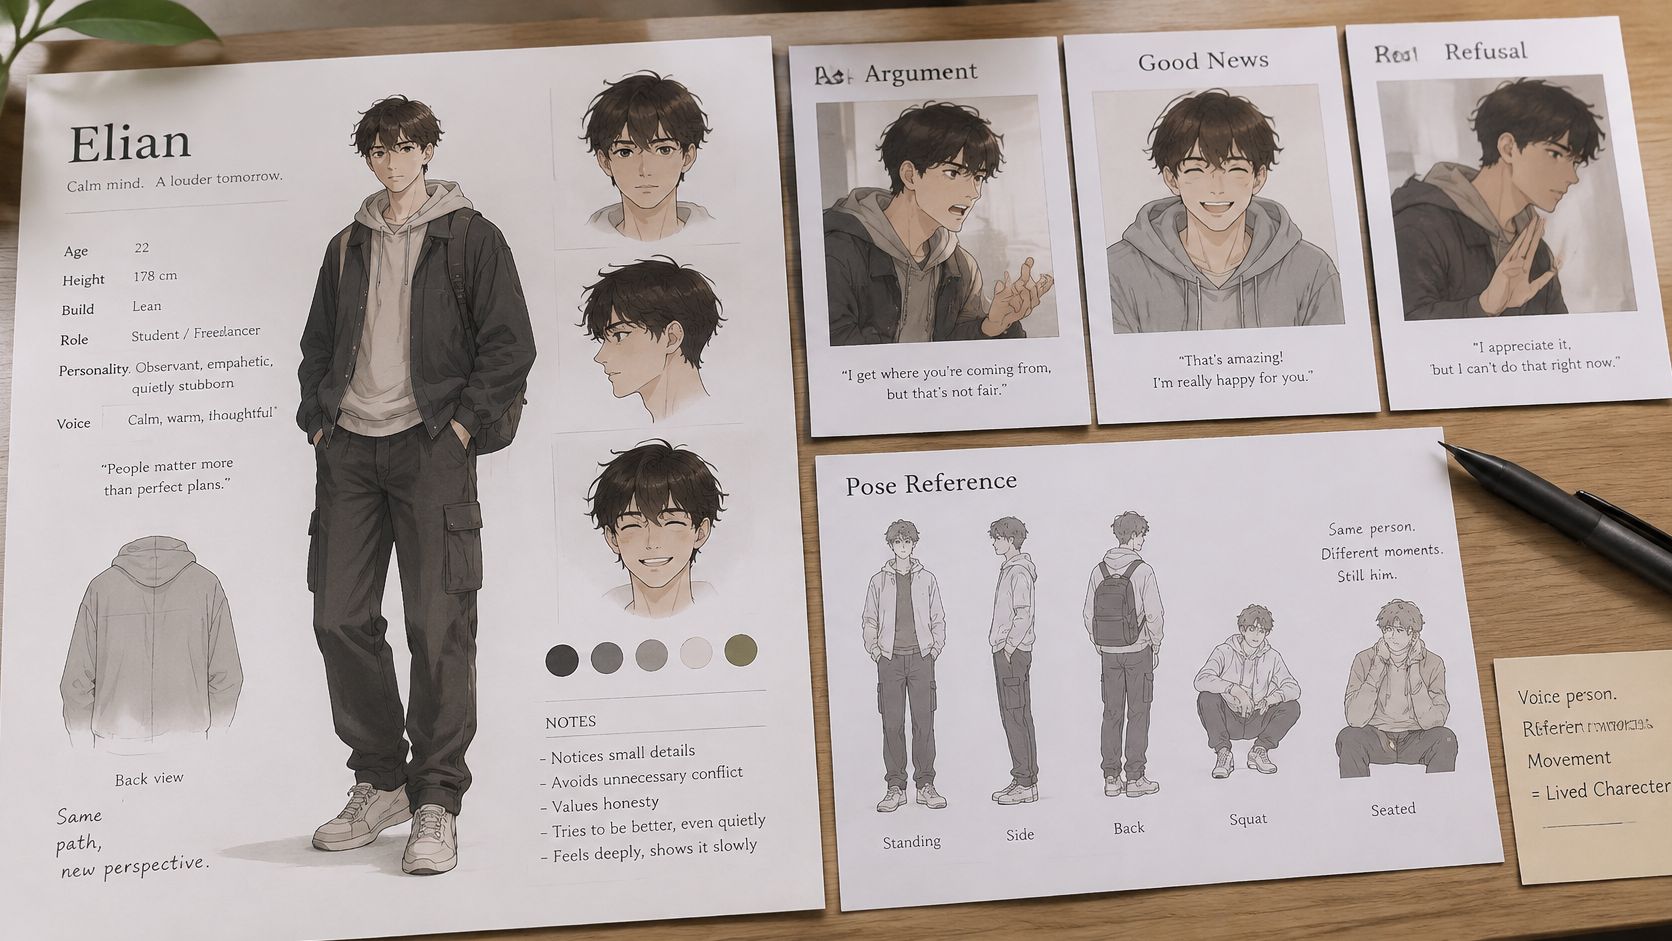
Most OCs fall apart here. A sheet full of likes and dislikes doesn't tell you how someone refuses a request, enters a room, or reacts to good news.
Use this reference sheet as a reminder to record expressions and poses beside the main design, not as an afterthought.
Test the Character in Three Scenes
A compact set works better than endless biography: a hook, an actionable want, an obstacle, and speech patterns. A guide to making an OC highlights the common gap between a character sheet and a repeatable performance across comics, videos, roleplay, and social posts.
Write three short situations: an argument, a piece of good news, and a request your OC refuses. Draft each line in a neutral voice first, then rewrite it using the bible's speech habits. Compare the before and after lines. The second version should sound like only this character could say it.
Check posture and expression while you revise. A guarded character might smile at good news but fold their arms and step back. A few clear decision rules and scene tests often make a character more recognizable than hundreds of biography prompts.
Watch the animation example below with your bible open, and note which gestures and pauses your OC would keep or reject.
Voice and Movement Options Compared
| Option | Best for | Effort | Consistency risk |
|---|---|---|---|
| Written persona only | Roleplay and comic captions | Low | Tone drifts between posts |
| Your own recorded voice | Personal channels and narration | Medium | Recording quality varies |
| Text-to-speech voice | Quick explainers | Low | Accent and pacing may not match the character |
| Custom synthetic voice | Recurring video series | Medium | Needs consent and rights records |
| 2D rigged animation | Expressive scenes and shorts | High | Model edits can break the rig |
| 3D or talking avatar | Presenter-style channels | Medium to high | Expressions look uncanny when overdone |
| Static image with lip-sync | Simple talking clips | Low | Limited gesture range |
Pick the route that matches your format and schedule. If it involves cloning a voice or likeness, keep consent records with the project files.
Check Originality and Real-Person Rules
A clever name doesn't protect a character. That's the assumption to drop first.
The U.S. Copyright Office guidance on copyrightable authorship states that copyright protects original works once they're fixed in a tangible form, such as a drawing, written profile, comic, model sheet, or animation. Protection covers the particular expression shown, including facial features, body shape, clothing, accessories, backstory, dialogue, behavior, and relationships. It doesn't generally cover only a name, broad idea, archetype, or unfixed concept.
Run a Divergence and Clearance Check
- Collect references by category. Gather silhouette, clothing era, materials, color, gesture, and narrative role separately. Don't build the whole design from one recognizable character.
- Record every source. Save source images, dates, licenses, and the specific transformation you made. Keep dated sketches, turnarounds, color references, and editable files.
- Search the final design. Run reverse-image and marketplace searches. Change any combination that makes fresh viewers name a particular existing franchise.
- Freeze a versioned bible. Lock turnarounds, proportions, palette values, costume rules, prohibited variations, and written behavioral constraints for version one.
- Handle real references with consent. If the OC draws on a real culture, disability, identity, or person, map what you know firsthand, consult people where needed, and check for stereotypes. Get written consent before using a real person's likeness or voice, and separate invented characters from impersonation.
- Label synthetic media where appropriate. Keep rights records for reference images and audio beside the exports.
A registered drawing protects the expression in that deposit. It doesn't automatically cover every future redesign.
Registration of one comic or illustration doesn't create blanket protection for every later version. Names, trademarks, and derivative rules also vary by country, so get jurisdiction-specific legal advice before commercial use. Your dated development record still matters because it shows the human decisions behind the character and how the design evolved.
Export Your OC for Videos and Avatars
Exports fail in boring ways. The face sits too close to the edge, a circular crop cuts off the hair, or a tiny emote turns into colored noise. Build from one master file and these problems mostly disappear.
Export From the Master, Not From a Small Copy
- Fix a master file at the largest size you'll need. Keep the character on a clean transparent background, with layers intact.
- Export a widescreen video version. Keep the character inside the central safe area so captions and interface elements don't cover key props.
- Crop a vertical version for short-form platforms. Keep the face centered, and don't rely on details near the left and right edges.
- Export a square profile avatar. Leave a margin around the head so the design survives circular cropping.
- Make a small emote or icon version. Simplify the expression, then view it at actual size. If you have to zoom in to understand it, redraw it bolder.
- Name files with character, version, and date. Store the layered or native project file as the source archive, not a flattened copy.
Resizing a small export upward loses line quality and makes painted edges look soft. Always work downward from the master. Chat, avatar, and animated upload limits differ by platform, so check each destination before uploading rather than assuming one file fits everywhere.
Export Specs for Common OC Uses
| Use | Format | Note |
|---|---|---|
| Widescreen video | MP4, 1920 by 1080, 16:9 | Keep the character in the central safe area |
| Vertical short-form video | MP4, 1080 by 1920, 9:16 | Keep the face in the centre 60% of the frame |
| Profile avatar | PNG with transparent background | Leave a margin around the head for circular crops |
| Chat emote or icon | PNG | Check legibility at actual size |
| Animated avatar loop | GIF or WebM | Keep the loop short and check each platform's limit |
| Source archive | Layered PSD or native project | Keep unflattened so edits stay possible |
Finish by viewing every export on a phone. That's where most viewers will meet the character first, and small contrast or cropping problems show up immediately at that size.
Run the Final Check and Save Version One
Turn the argument, good news, and refusal scenes into a 30-second script. This is your go or no-go test, not a final polish pass.
Keep your workspace files together while you check the script against the model sheet and bible.
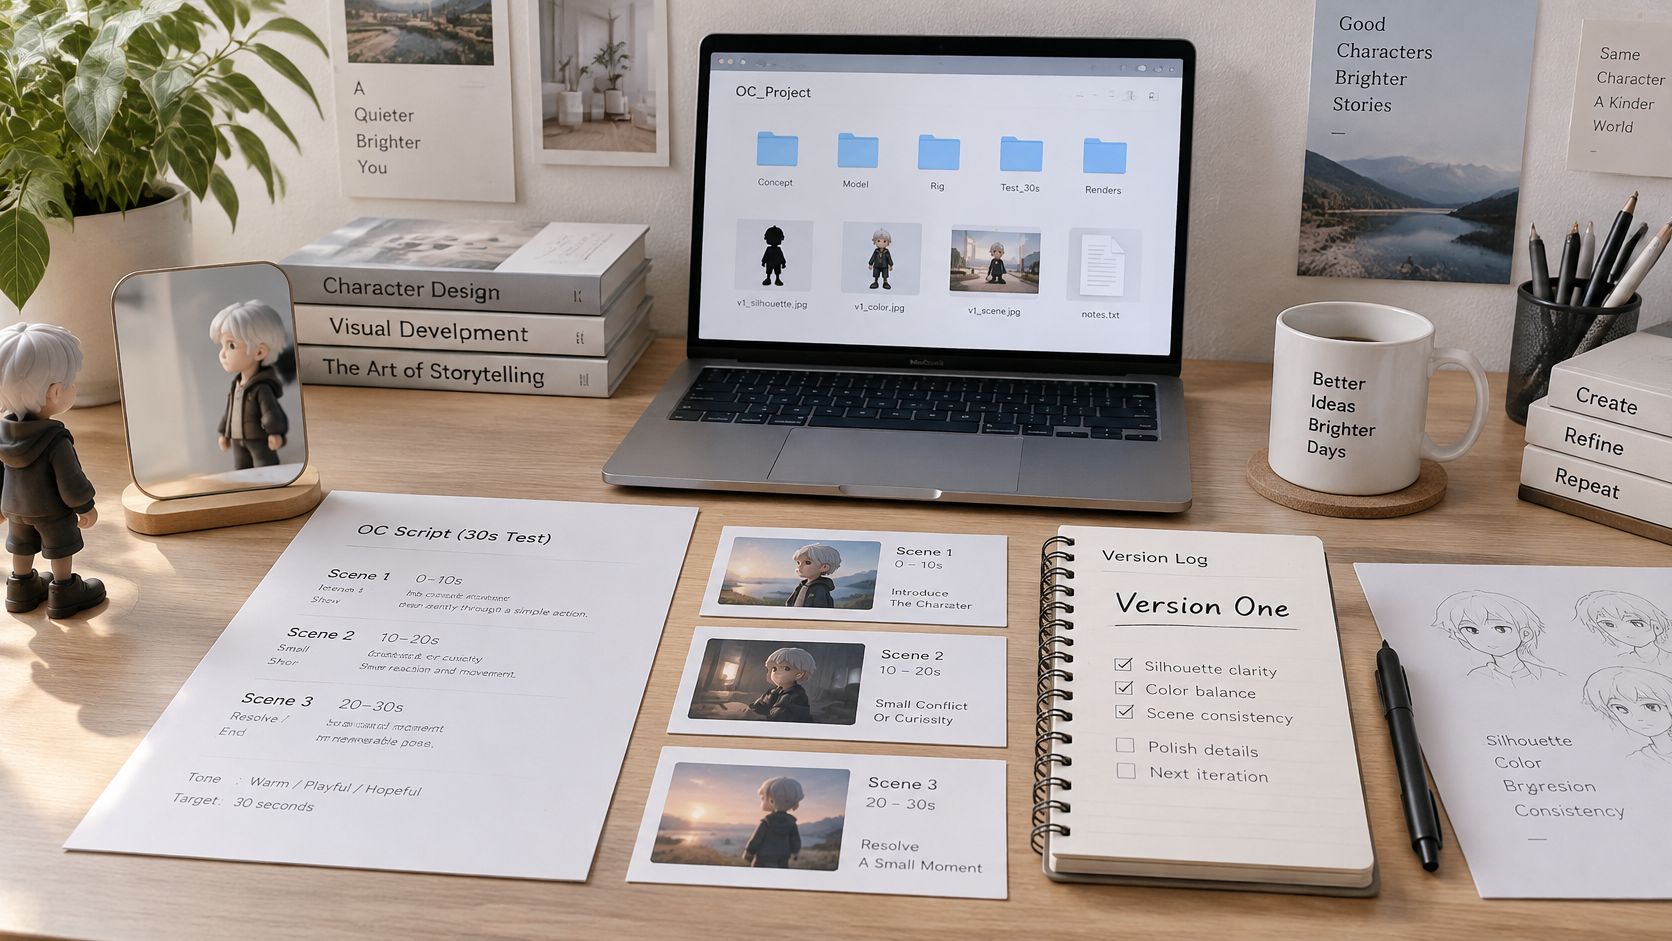
Check three things in each scene: the silhouette still reads at thumbnail size, the lines follow the bible's speech pattern, and props appear where the backstory says they should. If all three pass, produce the first video or avatar clip. If one fails, revise the bible before the artwork, because the problem usually sits in an undefined trait.
Save the bible, model sheet, exports, consent records, and source log together as version one. Then plan a second scene with a character who challenges your OC. Relationships reveal whether the personality holds outside one comfortable setting. Bring your idea through Idea, Script, Visuals, Voice, Video, Music and SFX, Captions, and Publish, and update the bible after each scene so the character grows without losing their identity.
You've now got the bible, test scenes, and exports needed to turn your OC into a repeatable animated avatar without rebuilding the character for every post. With LunaBloom AI, you can bring that idea forward and create the video without a complicated editing workflow, moving from script and visuals to voice, captions, and publishing in one creator flow. Start with your 30-second test scene, check it against version one of your bible, and publish the first clip while the character is still fresh.