Let’s start with a simple truth: the success of your training video is decided long before you ever hit the record button. Great training videos don’t happen by accident. They are the result of a solid strategy designed to solve a specific problem for a specific audience.
It all begins with understanding what your team truly needs to learn, setting clear, achievable goals, and knowing exactly who you’re speaking to. Without this foundation, you’re just creating content, not effective training.
Laying the Groundwork for Effective Training Videos
Before you think about scripts, cameras, or editing software, you need to nail down your strategic plan. A well-planned video feels targeted, relevant, and useful because it is. Skipping this step is like trying to build a house without a blueprint—you might end up with something standing, but it won’t be what your team actually needs.
This foundational work is what transforms a passive viewing experience into genuine skill development and improved job performance.
The demand for this type of content is booming. The global online learning market was valued at around $314 billion in 2024 and is projected to reach $355 billion in 2025. More specifically, the eLearning video market is expected to skyrocket to $625.3 billion by 2029, proving just how essential video has become for workplace learning.
This simple flow shows how to build your strategy: identify the knowledge gap, define what success looks like, and then get to know your viewers.
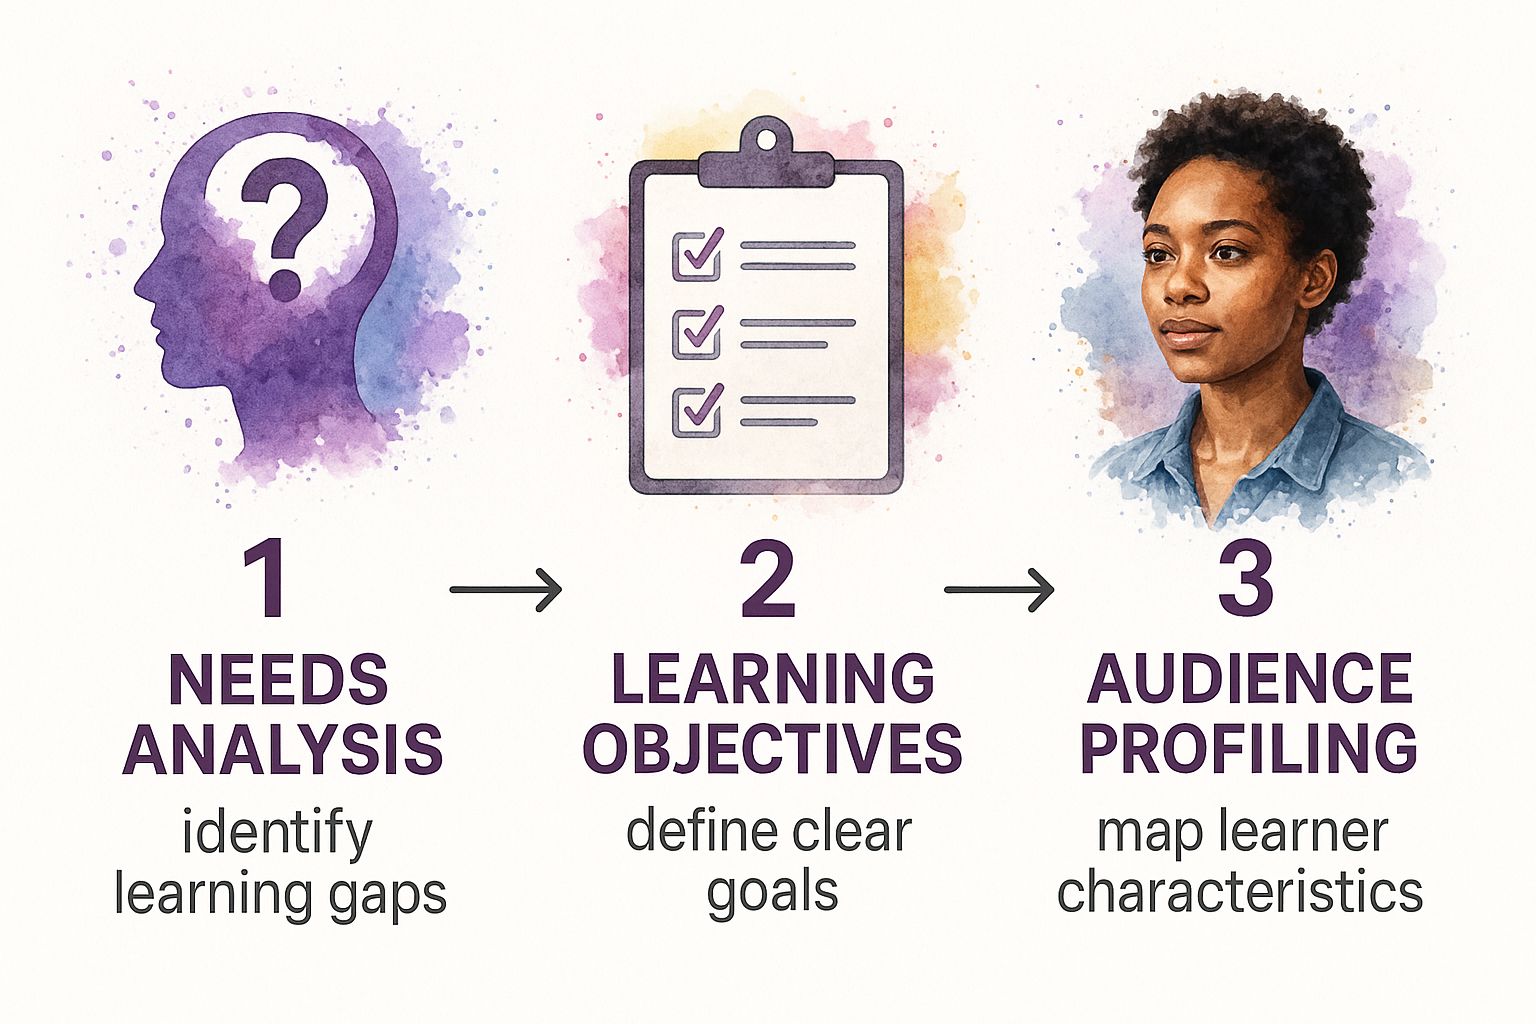
Each step logically builds on the last, ensuring your final video is perfectly aligned with both business needs and how your learners think.
To keep your planning focused, it helps to answer a few key questions right from the start.
Core Questions for Your Video Training Plan
Answer these strategic questions before production to ensure your training video is targeted, relevant, and effective.
| Planning Element | Key Question to Address | Example Answer |
|---|---|---|
| Needs Analysis | What specific problem is this video solving? | “Our support team is struggling with the new CRM’s ticket assignment feature, causing delays.” |
| Learning Objective | What should the viewer be able to do after watching? | “They will be able to create and assign a new customer ticket in the CRM in under two minutes.” |
| Audience Profile | Who is this video for, and what’s their context? | “New support hires with basic tech skills, watching at their desks during their first week.” |
Thinking through these points ensures you’re creating a practical tool, not just another piece of content.
Pinpoint Knowledge Gaps with a Needs Analysis
First, you need to conduct a needs analysis. This isn’t about guessing what your team needs help with. It’s about identifying the real gaps in their skills, knowledge, or daily processes.
Where do the same mistakes keep happening? Is there a new piece of software causing widespread headaches? Are crucial safety procedures being overlooked?
The answers to these questions provide the why behind your video. For example, if the support team is fumbling a new CRM feature, a short, targeted training video is a direct fix for a measurable problem. The best ways to find these gaps are to talk to people, examine performance data, and simply observe how work gets done.
Set Clear and Measurable Learning Objectives
Once you’ve identified the problem, you must define what a solution looks like. This is where learning objectives come into play. These are crystal-clear, actionable statements that spell out exactly what the viewer should be able to do after watching your video.
Think of it as a promise to your learner. Instead of a vague goal like “get better at the CRM,” a strong objective is specific: “After watching this video, you will be able to create and assign a new customer ticket in the CRM in under two minutes.”
A great learning objective is your North Star. It guides every single decision you make, from what goes into the script to how you edit the final cut. If a piece of content doesn’t directly help achieve that objective, it doesn’t belong in the video. Simple as that.
Understand Your Audience Deeply
Finally, you have to know who you’re talking to. Creating an audience profile helps you tailor everything—the tone, the language, the complexity of the examples—to fit the person on the other end of the screen.
Ask yourself these questions:
- What do they already know? Are you teaching total beginners or experienced pros who just need a quick refresher? A video for a new hire looks completely different from one for a senior developer.
- How tech-savvy are they? This will influence how quickly you move through steps and the jargon you use (or consciously avoid).
- Where will they be watching? At a quiet desk with headphones? Or on a noisy factory floor with a tablet? This informs decisions about on-screen text, audio clarity, and video length.
When you truly understand your audience, you can create a training video that not only teaches but also resonates and engages. To explore the entire process further, check out guides like Your Guide to Becoming a Training Video Creator.
Turning Your Ideas into a Compelling Script
With your strategy locked in, it’s time to translate your learning objectives into a story that connects with people. This is where the real craft of creating training videos shines. A well-written script is the single biggest factor separating a video people have to watch from one they want to watch. It’s the blueprint for everything that follows.
A great script isn’t just a list of facts; it’s a conversation. You have to write for the ear, not the eye. This means ditching the corporate jargon and complex sentences that might look fine on paper but sound clunky and robotic when spoken aloud.

Crafting a Natural and Conversational Script
Authenticity is key in a training video script. People learn best from instructors they trust and can relate to. Your script’s tone should aim for a helpful, conversational style, not a formal lecture delivered from a podium.
My best advice? Read every line out loud as you write it. Does it sound like something you’d actually say to a coworker? If it feels awkward or unnatural, rewrite it until it flows smoothly. Remember, studies show that 83% of people would rather watch a video than read instructions, and a big part of that preference is the personal connection video can create.
Here are a few simple tricks to make your script feel more human:
- Use contractions: Words like “don’t,” “it’s,” and “you’ll” instantly make your language feel more natural and relaxed.
- Keep sentences short: Shorter sentences are easier for viewers to process and follow along.
- Talk directly to the viewer: Use “you” and “your.” This makes the content feel personal and immediately relevant.
- Ask rhetorical questions: Dropping in a question like, “So, how do you find that feature?” can recapture attention and encourage active thinking.
These small adjustments can transform a dry script into a guided conversation, which makes a world of difference in how much people actually learn and retain.
Structuring Your Script for Maximum Impact
A disorganized script leads to a confusing video. It’s that simple. To ensure your learners can follow along and remember what you taught them, you need a solid structure. The classic hook, body, and conclusion framework is popular for a reason it works.
The hook is your first 10-15 seconds. It’s non-negotiable. You must grab your audience’s attention immediately and give them a compelling reason to keep watching. Start with the problem your video solves or a surprising statistic.
The body is where the actual teaching happens. Break your topic into logical, bite-sized steps. Don’t try to cram too much information in at once; the goal is to build knowledge piece by piece. Each point should flow smoothly into the next, creating a clear learning path.
Finally, your conclusion needs to wrap things up neatly. Briefly summarize the key takeaways and provide a clear call to action. Should they practice the skill? Take a quiz? Move on to the next video in the series? A strong conclusion reinforces the learning and gives the video a sense of purpose.
A well-structured script doesn’t just present information; it guides the learner on a journey. By starting with a strong hook, building knowledge step-by-step, and ending with a clear takeaway, you create a learning experience that is both memorable and effective.
From Script to Storyboard: A Visual Roadmap
With your script finalized, the next step is to build a storyboard. This might sound like a task for a professional artist, but it’s not. A storyboard is simply a visual plan that maps out what will be on screen while your script is being read. It’s an essential tool for ensuring your audio and visuals work together perfectly.
Think of it as a comic-book version of your video. For each key point in your script, you’ll sketch out (or just describe) the visual that accompanies it.
Here’s what I always include in my storyboards:
- Shot Composition: A quick sketch—stick figures are perfectly fine!—or a written description of what the camera sees. Is it a close-up of a presenter, a wide shot of a process, or a screen recording?
- On-Screen Text: Note any keywords, bullet points, or callouts that need to appear on the screen.
- Graphics and Animations: Plan where you’ll use charts, icons, or simple animations to clarify a concept.
- Narration Snippet: Copy the corresponding line from your script so you can see exactly how the audio and visuals align.
Storyboarding is a game-changer because it helps you spot potential problems before you start recording. You might realize a section is too text-heavy, a concept needs a better visual, or the pacing feels off. Fixing these issues during the storyboard phase is far easier (and cheaper) than trying to fix them in post-production.
Getting the Right Gear and Recording with Confidence
Now, let’s talk about technology. This is where many aspiring creators get stuck, assuming they need a Hollywood-sized budget to produce something professional. The good news is, you really don’t. A few smart, practical equipment choices will go much further than a pile of expensive, complicated gear.
The goal is to set up your space so you can hit record and capture great-looking, great-sounding footage without any friction. When you’re confident in your setup, that confidence shines through on camera.

Prioritize Crystal-Clear Audio
If you invest in only one piece of gear, make it a dedicated microphone. People are surprisingly forgiving of video that isn’t perfect, but bad audio is an instant deal-breaker. If your audience has to strain to hear you over buzzing, echoes, or background noise, they will tune out immediately.
Your computer’s built-in microphone is not up to the task. It’s designed to pick up all ambient sound, which means it captures your voice along with the hum of your air conditioner and the clacking of your keyboard.
Here are a few solid, affordable mic options:
- USB Microphones: These are the go-to choice for most creators. Models like the Blue Yeti or Audio-Technica AT2020 plug directly into your computer and deliver excellent quality for under $150.
- Lavalier (Lapel) Microphones: These are the small mics that clip onto a shirt. They stay close to the speaker’s mouth, providing consistent, clear sound. Wired versions are very affordable (around $20-$50) and are great if you need to move around on camera.
The single most important element of a training video is not the camera, the lighting, or the editing—it’s the audio. Clear, crisp sound ensures your message is heard and understood, which is the entire point of the training.
Choose the Right Camera for Your Needs
You probably already own a camera that’s more than good enough. There’s no need to rush out and buy the latest and greatest model. The best camera is often the one you already have and know how to use.
Modern smartphones are incredible video cameras. The latest iPhones and Android devices can shoot in beautiful 4K, have built-in image stabilization, and are incredibly easy to operate. Just place it on a tripod to ensure a steady shot.
When you’re ready to upgrade, consider these options:
- Webcams: A high-quality webcam like the Logitech C920 is a significant step up from your laptop’s built-in camera. It’s a simple plug-and-play solution perfect for talking-head videos.
- DSLR or Mirrorless Cameras: For that truly professional look with a soft, blurred background (known as bokeh), a DSLR or mirrorless camera is the way to go. They represent a larger investment, but the creative control you gain is unmatched.
Master Simple and Effective Lighting
Good lighting is the secret ingredient that makes amateur video look professional. And the best part? It doesn’t have to be complicated. Your goal is simply to light your face evenly, without any harsh or distracting shadows.
The cheapest and best light source is a window. Just face it when you record. This provides soft, natural, and flattering light. Whatever you do, avoid sitting with a bright window behind you—you’ll end up as a dark silhouette.
If you don’t have access to good natural light, a ring light is a fantastic, budget-friendly investment. It provides even, shadow-free light that instantly elevates your video quality.
Selecting the Best Screen Recording Software
For any training that involves demonstrating software or walking through a process on your computer, you’ll need good screen recording software. The right tool makes this process painless and often includes built-in editing features.
Here’s what to look for when choosing one:
- High-Resolution Recording: You must be able to capture your screen in crisp HD. No exceptions.
- Webcam and Microphone Capture: The best tools can record your screen, your face via webcam, and your voice simultaneously.
- Basic Editing Tools: Look for software that lets you easily trim mistakes or add simple annotations like arrows and text boxes.
Getting the technical details right matters. The global eLearning market is expected to hit $203.81 billion by 2025, with video playing a massive role. Simple features like AI-powered subtitles have been shown to increase learning productivity by up to 43%. Your gear choices have a direct impact. You can discover more insights about the growing eLearning landscape and how technology is shaping it.
Bringing It All Together in the Edit
You’ve captured all your raw footage. Now for the fun part: post-production. This is where the magic happens, transforming separate clips into a polished, professional training tool that delivers on its promise.
Think of yourself as a storyteller. You have all the pieces of the puzzle—your recordings, voiceovers, and graphics. The editing process is where you weave them together into a clear, seamless narrative that guides your learner from start to finish.
Core Editing Skills for Training Videos
The good news is you don’t need to be a Hollywood editor to create a great training video. The process of creating training videos that look fantastic often comes down to a few fundamental skills.
First, choose your software wisely. User-friendly editing tools, like our own LunaBloom AI, are designed to be intuitive so you can focus on the content, not on navigating complex menus. Once you’re set up, your primary tasks are trimming and arranging your clips.
This is all about cutting out anything that doesn’t add value. Remove the mistakes, awkward pauses, and any footage that distracts from the main point. A tight, clean edit keeps the pace energetic and holds your viewer’s attention. Then, simply arrange your clips in the logical order you planned in your storyboard.
A great edit is invisible. The viewer shouldn’t even notice the cuts or transitions. They should just experience a smooth flow of information that feels completely natural. Your goal is to remove distractions, not create new ones.
Boosting Clarity with Visual Aids
With your main footage assembled, it’s time to layer in elements that help the information stick. Simple graphics, text overlays, and callouts are incredibly powerful for highlighting key points and keeping learners engaged.
Think about how you can show what you’re saying:
- Text Overlays: Use these to introduce a new topic, define a key term, or display a critical statistic on screen. Keep the text brief and easy to read.
- Callouts and Arrows: If you’re demonstrating software, these are essential. Use arrows or highlighted boxes to direct the viewer’s eye exactly where it needs to go.
- Simple Graphics: A basic chart or a well-placed icon can often explain a complex idea more quickly and effectively than words alone.
These visual aids do more than just break up the monotony of a talking-head video; they actively reinforce your learning objectives and make the content far more memorable.
The Subtle Power of Audio and Music
Remember how we prioritized clear audio during recording? It’s just as critical in the edit. You’ll need to balance the audio levels of your narration, any sound from your clips, and background music to create a professional soundscape.
Your narration is the star of the show—it must be clear and easy to understand at all times. Background music can add a nice touch of polish, but it needs to stay in the background. My advice is to stick with instrumental tracks that match the tone of your training and keep the volume low enough that it never competes with your voice.
Adding Captions for Accessibility and Engagement
This is no longer a “nice-to-have”; it’s a necessity. Adding captions makes your content accessible to viewers who are deaf or hard of hearing, not to mention the large number of people who watch videos in noisy environments or with the sound off. In fact, one survey found that 92% of participants watched videos without sound, relying entirely on captions.
LunaBloom AI automatically generates subtitles for your videos, saving you a significant amount of time. For complete accessibility and to make your videos searchable, you can also explore online transcription services that provide highly accurate transcripts.
Final Touches and Exporting
Before you publish, a couple of final checks will ensure your video looks its best. A little color correction can make your footage look more vibrant and consistent, especially if you filmed in different locations or at different times. You don’t need to be a professional colorist—most editing software has simple, one-click tools to adjust brightness, contrast, and saturation.
Finally, it’s time to export. Consider where this video will be hosted. Most platforms, like a company Learning Management System (LMS) or YouTube, have recommended settings. A safe and versatile choice is usually an MP4 file with H.264 encoding. It provides excellent quality without a massive file size, ensuring your video looks sharp on any device.
Sharing Your Video and Measuring What Matters
A brilliant training video is useless if no one sees it. After all the hard work of scripting, recording, and editing, the final step is getting your video in front of the right people and proving that it actually worked. This is where you transform your creative effort into measurable business results.
Your first major decision is where to host the video. This choice impacts who can see it, how secure it is, and what kind of data you can collect. The goal is simple: make it incredibly easy for learners to access while giving you the control and insights you need.
Choosing the Right Distribution Platform
The best home for your video depends on your audience and security requirements. An internal-only compliance video, for example, has completely different needs than a public-facing product tutorial.
Consider your options carefully:
- Learning Management System (LMS): This is the gold standard for formal corporate training. An LMS allows you to track individual progress, assign mandatory viewing, and link video completion to certifications or performance reviews.
- Company Intranet or Shared Drive: For more informal training, a platform like SharePoint or Google Drive can work well. It’s straightforward and uses tools your team is already familiar with, but you will likely miss out on advanced analytics.
- Private Video Hosting: Platforms like Vimeo or a private YouTube channel offer a great middle ground. You can password-protect videos or restrict access, making them perfect for sharing with external partners or a remote team.
For many companies, creating these training videos is a direct investment in their people and their bottom line. The data doesn’t lie: companies with comprehensive training programs see 218% higher income per employee than those without. Why? Because well-trained teams are more productive, and training has a 92% positive impact on employee engagement. You can discover more stats on the value of employee training to see the full picture.
Measuring What Truly Matters
Once your video is live, the real work begins. It’s tempting to focus on vanity metrics like view count, but a high number of views tells you nothing about whether anyone actually learned something. To prove your video’s value, you must track metrics that tie directly back to the learning objectives you set from the very beginning.
True success isn’t about how many people clicked play; it’s about how many people learned a new skill, improved their job performance, or changed a key behavior because of what they watched.
The most important question to ask is not “Did they watch it?” but “Did it work?” Effective measurement moves beyond simple views to capture genuine learning and behavioral change, demonstrating a clear return on your training investment.
Key Metrics to Track for Real Impact
To get a complete picture of your video’s effectiveness, you need to analyze a mix of engagement, comprehension, and direct feedback. This data will tell you not just what happened, but why it happened.
Here are the metrics I always recommend focusing on for the deepest insights:
- Completion Rate: This is arguably the most critical metric. It tells you what percentage of viewers watched your video from start to finish. A high completion rate is a strong indicator that your content was engaging and relevant.
- Engagement Score: Most video platforms provide a graph showing where viewers dropped off. If you see a significant dip at a certain point, that’s a red flag. It could mean that section was confusing, boring, or too long.
- Quiz or Assessment Scores: If you pair your video with a short quiz, the scores are a direct measure of knowledge retention. It’s one of the clearest indicators of whether your key messages landed.
- Direct Feedback and Surveys: Never underestimate the power of simply asking your learners for their thoughts. A quick survey can provide invaluable qualitative feedback on what worked, what didn’t, and what they’d like to see in future training.
By tracking these specific metrics, you create a powerful feedback loop that helps you continuously improve. The insights you gather are fuel for refining your approach and making your next video even more impactful. With a tool like the LunaBloom AI video generator, you can act on that feedback almost instantly to create updated and improved content.
Common Questions About Creating Training Videos
Diving into video creation for the first time often brings up a few questions. Getting these sorted out early can save you a lot of headaches and help you avoid common mistakes. Let’s tackle some of the most frequent questions I hear.
How Long Should a Training Video Be?
Shorter is almost always better. The sweet spot for a single-topic training video is typically between three and seven minutes. This microlearning approach works with your audience’s natural attention span, not against it, which has been shown to improve information retention.
If you’re covering a large or complex topic, resist the urge to create one long video. Instead, break it down into a series of shorter, bite-sized videos. This makes the information far more digestible and allows learners to easily revisit specific segments when they need a quick refresher.
What Are the Biggest Mistakes to Avoid?
I’ve seen it all, but the three things that consistently ruin training videos are bad audio, a lack of structure, and information overload. Viewers will forgive slightly grainy video, but they will click away instantly if the audio is muffled, full of echoes, or hard to understand.
Your number one priority has to be clean, clear sound. An affordable external microphone is the single best investment you can make, and honestly, it’s a non-negotiable for creating training that people will actually watch.
Next is structure. A video that wanders aimlessly without a clear beginning, middle, and end is a recipe for confusion. Stick to your script to maintain a logical flow. Lastly, don’t try to cram too much into one video. A video with one clear learning objective will always outperform one that tries to teach ten things poorly.
Do I Really Need Expensive Equipment?
Absolutely not. The camera on a modern smartphone is more than powerful enough to shoot professional-looking video. The best place to invest your budget is in audio. You can get a fantastic, simple microphone for $20 to $50 that will elevate your quality instantly.
When it comes to lighting, your best tool is free: natural light. Simply set yourself up facing a window for soft, flattering light that looks great on camera. Focus your energy on creating valuable content and ensuring your sound is crisp, not on buying a lot of gear you don’t need.
Your Next Step in Video Training
Creating effective training videos is a powerful way to upskill your team, improve processes, and drive better business outcomes. It starts with a solid plan, a conversational script, and a focus on delivering clear, actionable information. By following the steps outlined in this guide—from strategy and scripting to recording and measuring results—you can produce professional-quality training content that your team will actually want to watch. The key is to start small, focus on clarity, and continuously refine your process based on feedback.
Ready to create polished training videos without the hassle? LunaBloom AI lets you generate professional content from text, complete with AI avatars and automatic subtitles, in minutes. Start creating with LunaBloom AI today!