You're on a train. A Reel starts. Sound stays off. If the words aren't on screen, you learn nothing and keep scrolling. That is the key purpose of Video Captions for Instagram. They carry your spoken line when audio can't. This guide shows you which format to pick, where to place it, and how to check it before you publish.
Why Muted Reels Need Words on Screen
Captions had the largest reported impact on Instagram Reels views at 41.5% in NP Digital's January 2024 analysis of 102,394 Instagram Reels and a survey of 1,681 viewers. That's a big signal, but it doesn't mean any auto text will do. You need the right words, in the right place, at the right time.
Say a bakery posts a Reel. The baker says, "Warm sourdough, out at nine." A commuter watches on mute. If that line sits only in the audio, the Reel is just hands and bread. If the line appears on screen, the message lands in two seconds.
Two Jobs Hide in One Word
Video captions can mean two different things. They can mean subtitles on the footage itself. They can also mean the caption typed under the post. Mixing them up is why a clip can look busy in the feed and still say nothing on mute.
You'll learn to name each format first. Then you'll see the Reel limits that push text around the frame. After that, you'll add captions inside Instagram, burn them in when needed, and run a short quality check.
This feature isn't new. TechCrunch's May 2021 report on the Captions sticker covered its arrival for Stories, with testing for Reels. Then MediaPost's report on the March 1, 2022 expansion noted automated captions reached feed videos and Reels in 17 languages.
By the end, you should be able to pick one format with confidence. You should also be able to publish a version a stranger can follow with no audio at all.
On-Screen Text Versus the Post Caption
Think of a shop window. Words painted on the glass are what passers by read as they walk past. The note taped to the door is what they read if they stop. On Instagram, the window is your video. The note is your post caption.
The Five Formats You Will Meet
Burned-in open captions are pixels inside your video file. Every viewer sees them, even someone who keeps captions off in settings. You control the exact words, size, and timing before upload. That's why they're the safest choice for ads and branded Reels.
Instagram auto closed captions come from speech recognition on video posts and Reels. Viewers can toggle them on the clip, and they can keep them on in their settings. That means you can't treat them as guaranteed. A viewer who has them off sees a silent video with no help.
The Captions sticker does the same conversion while you edit a Story or Reel. You place it, check the words, and move the block on screen. It's fast for in-app edits, but it's still machine text until you fix it.
The post caption is the paragraph under your upload. It holds your hook, keywords, hashtags, and call to action. It supports discovery and tells people what to do next. It does not subtitle your spoken line, so it can't rescue a muted clip.
There's also no simple sidecar route. RNID's Instagram captions guide explains that Instagram does not currently provide a general workflow for uploading a separate caption file such as an SRT file for ordinary video posts. If your file already has burned-in captions, disable Instagram's automated captions when that option is available, or the two layers stack and neither stays readable.
Practical rule: If the message must survive on mute, put reviewed words in the video itself. Use the post caption for context and the next step.
Which Instagram Caption Format Viewers Actually See
| Format | How it is made | Who sees it | Use it when |
|---|---|---|---|
| Burned-in open captions | Text exported inside the video file | Every viewer, sound on or off | Ads, brand films, and any Reel that must stay readable if captions are off |
| Instagram auto closed captions | Speech recognition inside the app | Viewers who turn captions on, or who set them on in accessibility settings | A fast first draft on feed video and Reels that you will edit before publish |
| Captions sticker | Sticker or caption control during Stories or Reels editing | Viewers of that Story or Reel after you place it | Stories and short in-app edits where you can fix words on the phone |
| Post caption | Text, keywords, and call to action under the post | People who read the feed copy; it is not on the picture | Context, search phrasing, hashtags, and the next step, never as a substitute for subtitles |
| SRT or other sidecar file | A separate caption file prepared outside Instagram | Not available as a general upload for ordinary posts | Skip the file upload and use burned-in captions or Instagram's own editor instead |
Use the table as your picker. Ask one question: does this viewer need to see the words, or can they choose? For most branded Reels, the default is clear. Use reviewed burned-in text on the video, plus a separate post caption below it.
What Captions Change for Access and Reach
Accurate captions do three jobs. Access comes first, then completion, then reach. Don't blend them into one vague promise about engagement.
The summary below sets out those three jobs in plain terms.
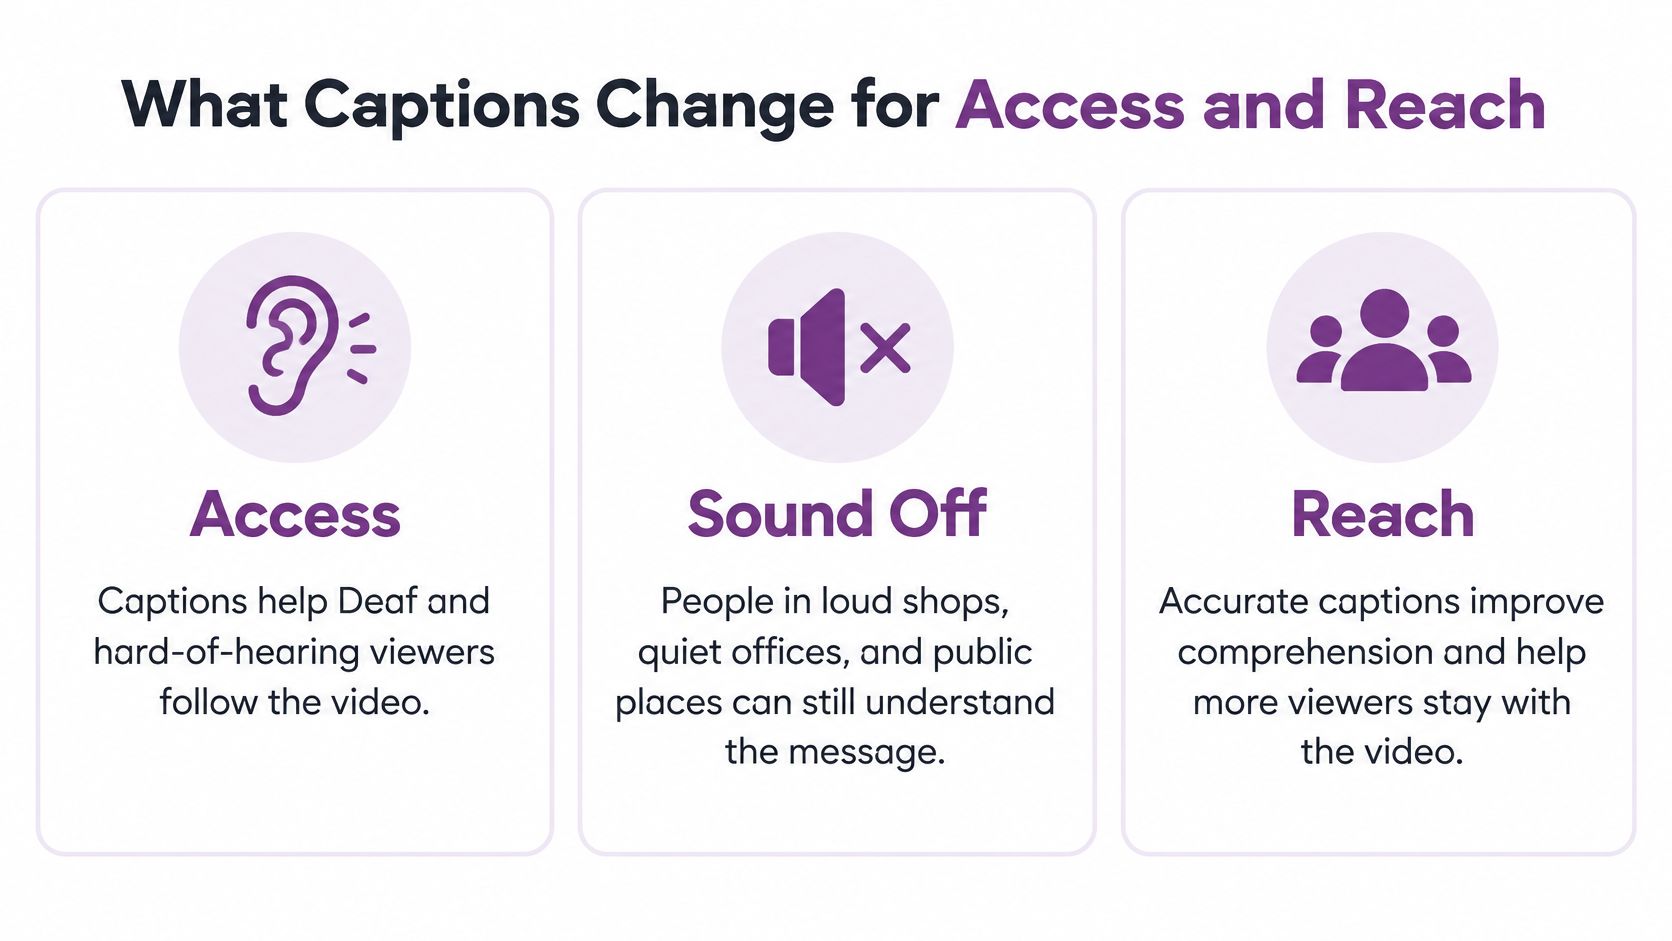
Instagram built captions for Deaf and hard-of-hearing viewers and for people watching where audio is inconvenient. Think of a loud shop, a quiet office, or a bus without headphones. For creators, auto captions for feed videos and Reels are on by default, while viewers can switch them off in the app. That setting gap is exactly why your most important line shouldn't depend on a toggle.
Completion and Reach Are Different Measures
A 2025 video-content statistics report stated that 80% of viewers are more likely to complete a video when subtitles or captions are included. That speaks to holding attention once someone starts watching. A Reel that makes sense on mute gives people a reason to stay past the first seconds.
Reach is separate. SocialPilot's 2025 Instagram Trends Report, based on 4.4 million posts from 2024, found Instagram videos reached 49% more audience on average than photos and carousels. And a 2025 report citing a survey of 5,381 people worldwide stated that 91% of Instagram users watch videos on the platform every week. Those figures show why video deserves effort. They don't prove captions alone create reach.
This short clip shows the muted viewing habit in a real feed setting.
Split your words by job. On-screen lines carry the spoken message and hold attention early. The post caption carries keywords, the product name, the audience, and the next click.
Don't stuff keyword phrases into subtitles. Write them in the post caption where they belong. Then check the risk in your on-screen text. One wrong automatic word, especially a dropped "not," can reverse a price, ingredient, or promise.
Reels Specs That Control Caption Placement
Specs decide where your captions can sit, so learn them before you edit. A line that looks fine on a laptop can vanish under buttons on a phone.
Instagram Video Limits That Change Captions
| Constraint | Figure to use | What to do with captions |
|---|---|---|
| Aspect ratio | Vertical 9:16 | Design lines for a tall phone frame, not a landscape subtitle bar |
| Resolution | 1080×1920 common; at least 720 pixels | Keep type large enough to read at phone size |
| Frame rate | At least 30 fps | Match caption in and out points to speech, not to a slideshow |
| Reel length | Up to 20 minutes; under 3 minutes for new audiences | Caption a tight hook instead of a long script |
| Safe area | Central region, clear of bottom controls | Do not park lines on the description, audio label, or buttons |
| Line shape | About two short lines | Break at a phrase, not in the middle of a product name |
| Auto-caption languages | 17 languages from the March 2022 rollout | Pick the spoken language, then correct names, numbers, and jargon |
Instagram's Reels help page notes Reels can be recorded and edited up to 20 minutes, but Reels longer than 3 minutes are not recommended to new audiences. So caption a tight hook, not a full lecture. Use a vertical 9:16 frame, commonly 1080×1920 pixels, with at least 720 pixels and 30 frames per second recommended.
Interface chrome crowds the edges. Likes, the audio label, the description, and reply controls sit near the bottom. Keep captions in the central viewing area, usually in no more than two short lines, with strong contrast against moving backgrounds.
Instagram's editor also lets you change caption language, punctuation, capitalization, profanity display, bilingual captions, movement, opacity, and timing. Design that style once and reuse it. If you want a worked example of placement choices in practice, see this guide to Instagram captions that work on mute before you lock your own template.
Run a quick export check every time.
- Vertical file: Confirm the frame fills a phone screen.
- Middle zone: Keep text clear of bottom controls and faces.
- Contrast check: Read each line over the brightest frame.
- Phone preview: Watch at real size, with sound off first.
How to Add Captions Inside Instagram
You can do this on your phone in one sitting. Follow the order below and don't skip the review step. The machine draft is fast, but it's not finished.
This visual maps the in-app path before you start tapping.
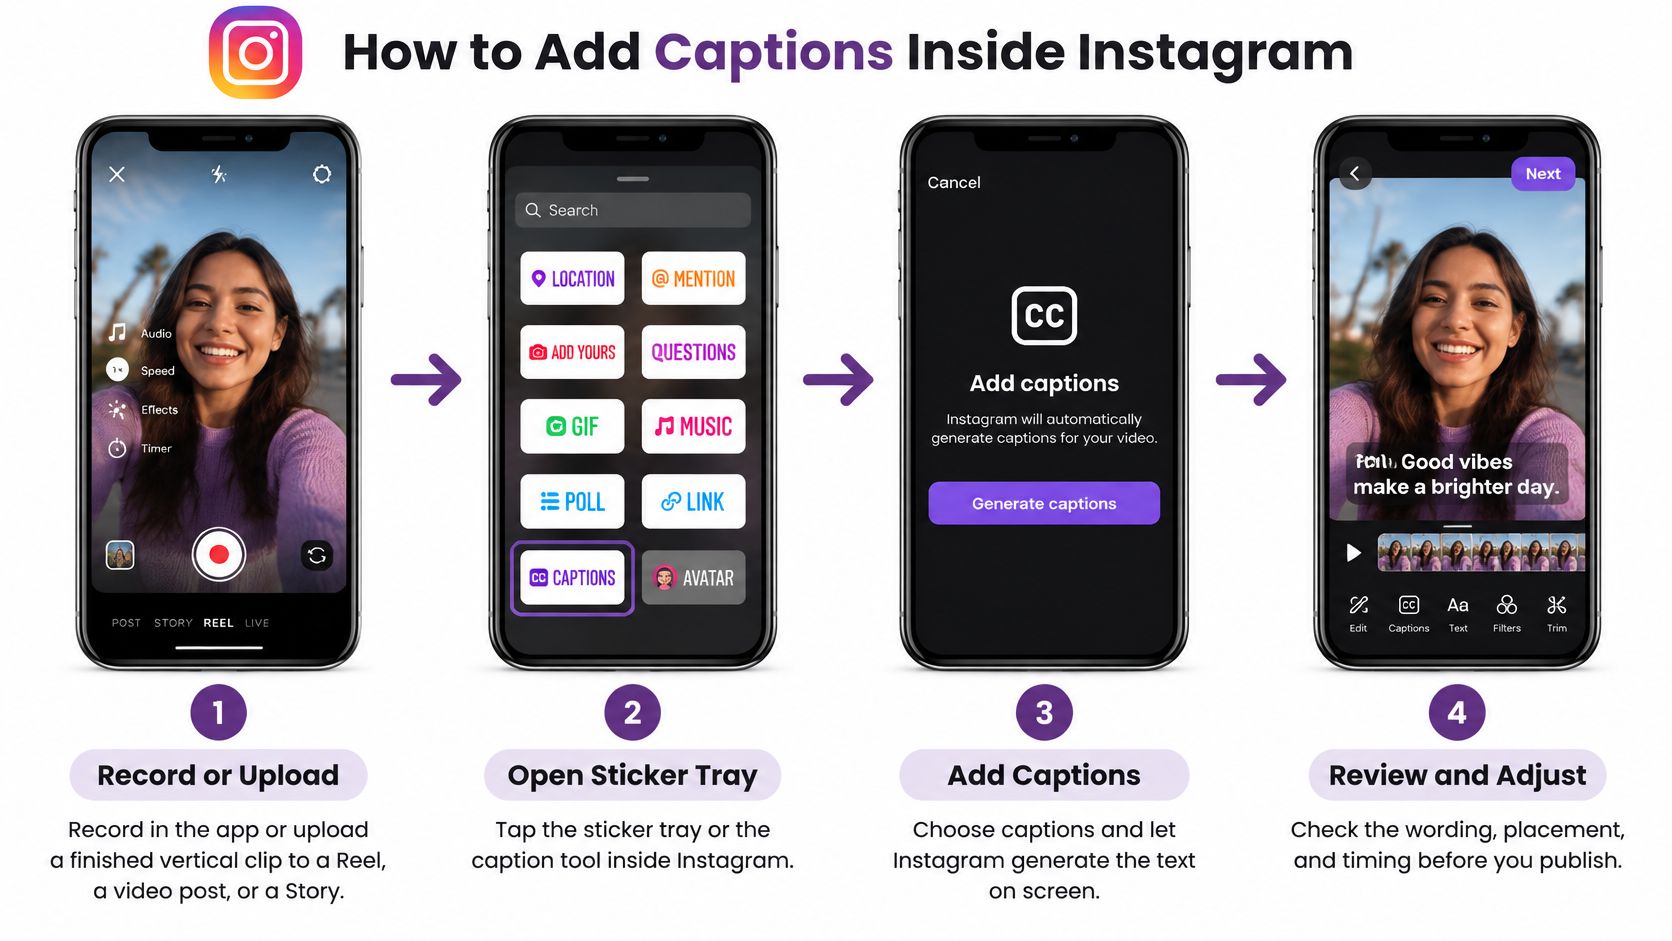
Utah State University's Instagram accessibility guide describes the Captions sticker and closed-captioning control that convert spoken audio into text during editing for Stories and Reels. It also stresses reviewing the transcript and tapping individual words to correct errors before you adjust size and placement.
The Eight Steps on Your Phone
- Record or upload. Record in the app or upload a finished vertical clip to a Reel, a video post, or a Story. Starting vertical prevents awkward crops later.
- Open the caption tool. Open the sticker tray or the video editing controls and choose Captions. On some clips you'll see a closed-caption control instead.
- Let speech recognition run. Wait for the transcript to build. Treat that text as a draft, not as a finished access layer you can publish untouched.
- Fix words one by one. Play the clip and tap individual words to correct names, prices, negations, and jargon. Check accents and anything background noise may have garbled.
- Set size and placement. Move the lines into the central safe area. Keep them off faces, product labels, and Instagram's buttons so nothing important hides.
- Avoid double captions. If your file already has burned-in captions, turn Instagram's automatic captions off when that switch is available. Two layers at once help nobody.
- Watch twice. Watch once with sound off, then once with sound on. Each line should appear with its phrase and leave before the next one starts.
- Publish, then write below. Post the video, then write a separate post caption for the offer, keywords, and next step. Don't paste the full transcript down there and call it done.
Small Differences Worth Knowing
Stories use the sticker during that Story's edit. Feed videos and Reels use the caption control on the clip. The tapping feels slightly different, but the review job is the same.
If a word changes money, safety, or meaning, type it yourself and read it back. Don't trust the machine with prices, dates, or the word "not."
Viewers can still hide closed captions in their own settings. That's not a flaw in your work. It's a limit of the format, and it's why step 6 matters. When you need every viewer to see the words, you'll want the burned-in method instead.
Take your time on step 4. Speech recognition often mangles brand names first, because they aren't common dictionary words. It also struggles when two people talk over music. Slow down on those spots, fix them by hand, and your muted viewer gets the same message as your listener.
Burn Captions Into the Video
Burn captions in when the text must read everywhere, for every viewer. This is the method for ads, product demos, and any Reel that has to sell or teach on mute.
Any editor you already know will do. The method matters more than the tool. Work through these steps in order.
- Write the transcript first. Type it line by line before you style anything. Check each name, price, and number against what's on screen.
- Split and time each line. Break speech into about two short phrases per caption. Bring each line in with the phrase and take it out before the next one, so readers never lag behind.
- Place text in the safe area. Keep lines in the central region, clear of faces, product labels, and bottom controls. Check the result at phone size, not on a big monitor.
- Add strong contrast. Use a solid or semi-transparent panel behind the text. That keeps words readable over bright, pale, or fast-moving frames.
- Export and test muted. Render the vertical file with captions in the picture. Play it on a phone with sound off and read every line as a stranger would.
- Upload and switch off the duplicate. Post the file, then turn off Instagram's automatic captions if they're available on that post. One clean layer beats two competing ones.
Keep an editable copy of the transcript with your project files. If a price changes next month, you can fix one line and re-export. Without that copy, you're retyping the whole thing from scratch.
Burned-in text can't be switched off by the viewer. For a tutorial or an offer, that's the point. The words travel with the file wherever it's shared.
Caption Lines Worth Copying and a Quality Pass
A transcript is not yet a caption. Transcripts keep every filler word. Captions keep the meaning and cut the noise, so a person can read at a glance.
The examples below show that edit in a simple checklist form.
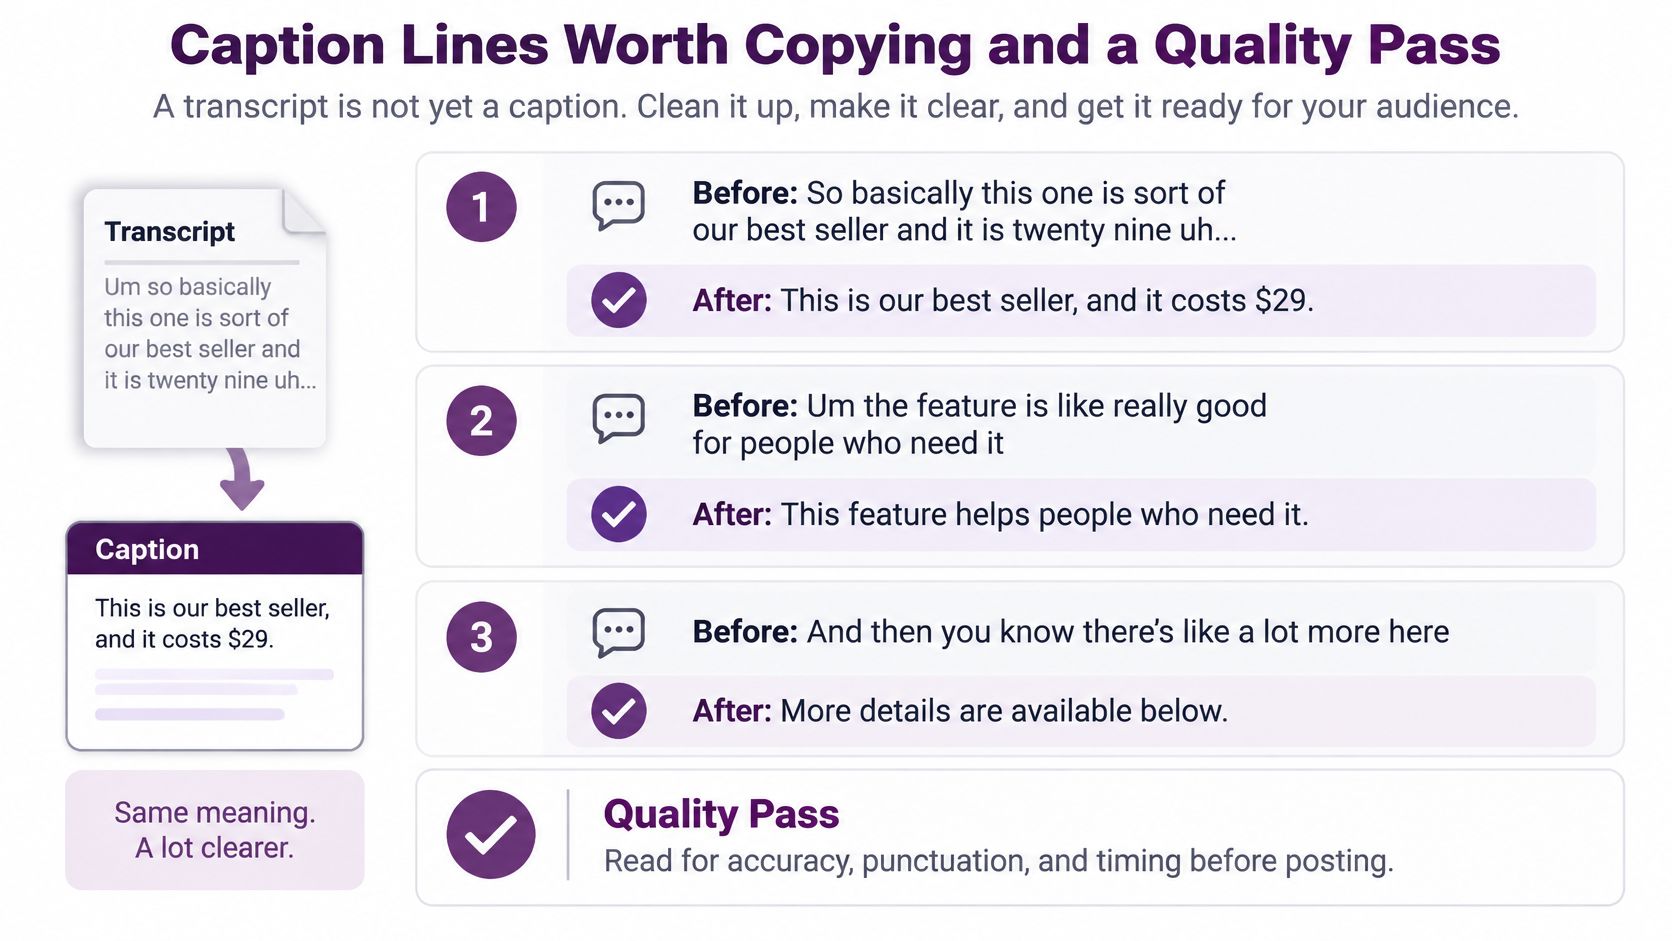
Three Before and After Lines
- Product demo: "So basically this one is sort of our best seller and it is twenty nine uh dollars" becomes "Best seller / $29 today."
- Tutorial: A dense spoken paragraph becomes "Step 1: Rinse the brush / Step 2: Press, don't scrub."
- Offer: "You will not want to miss this crazy deal guys" becomes "Ends Friday / Free shipping over $40."
Notice the pattern. Each rewrite keeps the fact and drops the filler. Each one also breaks at a natural pause, so your eye lands in the right place.
One Quality Pass Before You Publish
Run this check on every captioned Reel. It takes minutes and it catches the errors viewers remember.
- Speaker labels: Add names when more than one person talks, so readers know who said what.
- Meaningful sounds: Include [music], [applause], or [beep] when a sound carries meaning.
- Brand spellings: Confirm product names, people, and places letter by letter.
- Numbers: Read prices, dates, and sizes aloud against the picture.
- Contrast: Check text over the brightest and busiest frame.
- Line length: Keep lines short enough to read on a phone without effort.
- Timing: Make sure lines follow speech instead of appearing early or lingering.
Here's the plain truth. Automatic does not mean accessible. Texas Tech University's social media accessibility guidance summarises research including a 2026 systematic review of 36 peer-reviewed studies finding that synchronization, punctuation, readability, presentation, and how noticeable an error is all shape the viewer's experience. Bad timing can even cover the product you're trying to show.
Adapting Captions for Other Markets
For other countries, adapt rather than swap words. Idioms, humor, reading speed, and punctuation habits change by market. A call to action that sounds warm in one language can sound pushy or odd in another.
Speed makes this tempting to skip. VoxBooster's short-form caption statistics roundup reports Meta AI Reel translation expanded from four languages at launch in October 2025 to nine languages by January 2026. Yet a study of 10 automatically translated Instagram captions found only moderate readability, with 52% of examples requiring rereading and only 56% of the analyzed translation data judged accurate.
So use translation as a first pass, not a final one. Have a native speaker check high-stakes ads, prices, and health or safety claims. Then judge each version by retention, completion, saves, and conversions, not by whether a translate button existed.
Publish a Captioned Reel Next
You now have a simple choice, and it stays the same every week. Put reviewed words on the video for silent and Deaf viewers. Write a separate post caption for the offer and search phrase. Never publish the automatic draft untouched.
Pick your format by need. Use burned-in text when the message must survive with sound off. Use Instagram's automatic captions as a fast draft you'll edit. Use the post caption for context and the next step.
For a weekly routine, keep it short. Build or record the vertical clip, keep an editable caption track, and read every name and number against the picture. Preview on a phone with sound off. Only then should you publish.
If you sell products on camera, the same routine applies to demos and try-ons. An ai video generator for clothing brand workflow, for example, still needs your caption check on sizes, prices, and fabric names before the Reel goes live.
Our own creator workflow runs through eight steps: Idea, Script, Visuals, Voice, Video, Music/SFX, Captions and Publish. Automatic Captions are a feature of the studio for making videos clear, accessible and ready to watch, and we generate videos with multilingual voiceovers, background music, and customizable visuals without requiring advanced editing skills. Even with that first pass done for you, correct brand terms and local calls to action yourself.
When you remake a Reel for another market, rerun the same checks on each version. Don't assume last month's captions still fit. Make the Reel, fix the first caption line a muted viewer will see, and publish only when that line is true.
Start your next Reel in LunaBloom AI, where you can build the video, voice, music, and automatic captions in one studio workflow without advanced editing skills. Generate your first pass, then use the quality check above to fix brand words, numbers, and timing before you post. Visit LunaBloom AI today, caption one short clip, and publish a version your viewers can follow with the sound off.