A solid lesson plan is so much more than a to-do list. Think of it as your strategic roadmap—the blueprint that ensures every moment in the classroom is purposeful and drives real learning. It’s your guide to delivering a focused, engaging, and effective educational experience.
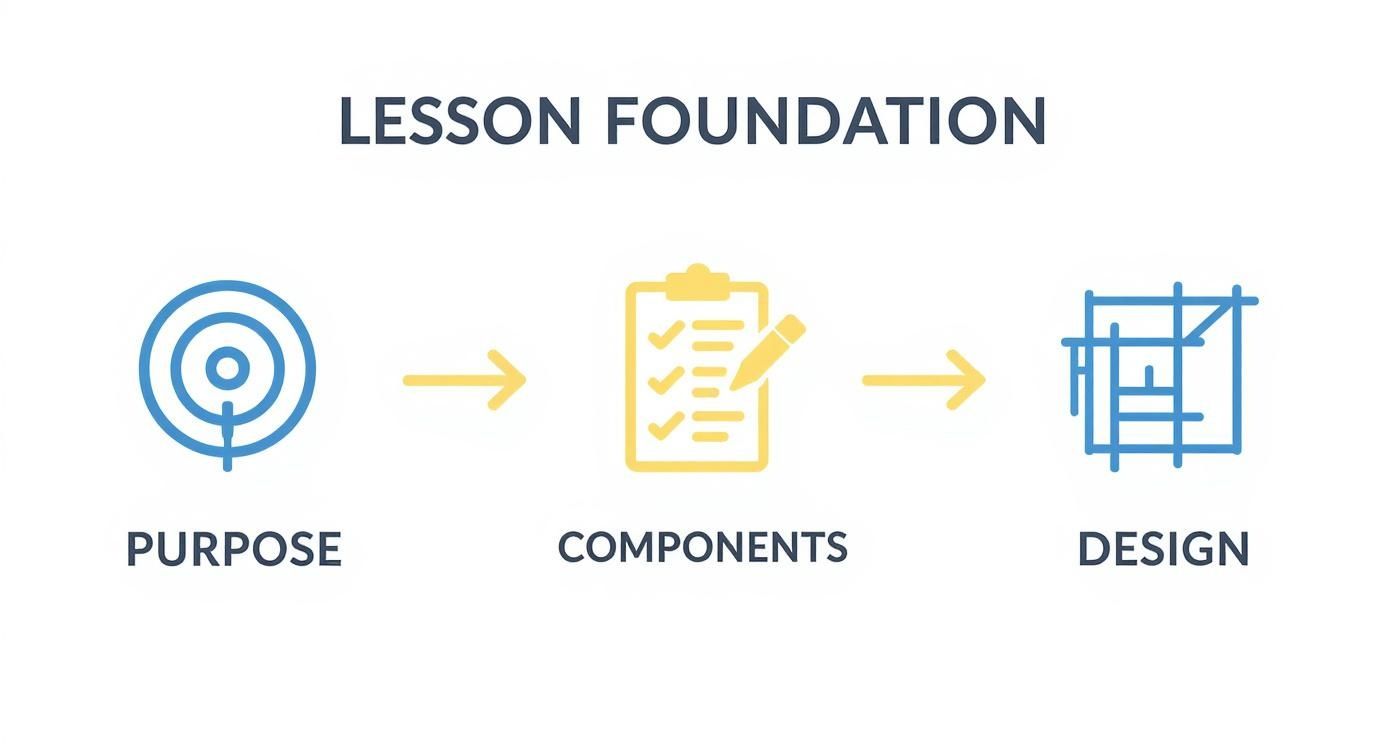
Building the Foundation of Your Lesson Plan
Before you jump into fun activities or gather materials, getting the foundation right is critical. A well-thought-out plan doesn’t just sharpen your focus; it gives you the confidence and flexibility to pivot when you need to. And in a dynamic classroom, you always need to.
The key is to anchor your entire lesson in a clear purpose. It all comes down to the “why” behind what you’re teaching.
Start With the End in Mind
The most effective lesson plans always start with the destination. Instead of brainstorming activities first, you need to define exactly what you want your students to know or be able to do by the end of the lesson.
This simple shift in perspective is a game-changer. One of the best frameworks for this is backward design lesson planning, which forces you to prioritize the learning outcomes above everything else. When you know where you’re going, every activity, discussion, and assessment becomes a deliberate step toward that goal.
This approach transforms your class time from a series of disconnected events into a cohesive, story-like learning journey.
Starting with a clear purpose ensures every choice you make directly supports your ultimate learning goals. It’s a logical first step that makes the rest of the process smoother.
The Impact of a Solid Plan
This isn’t just about feeling organized; it’s about student success. The data backs this up. According to the UNESCO Institute for Statistics (UIS), teachers who receive structured training in lesson planning are 35% more likely to see higher student engagement and better outcomes.
In another study, a whopping 78% of educators who used detailed, standards-aligned lesson plans reported measurable improvements in their students’ test scores.
A great lesson plan doesn’t just outline what to teach; it anticipates how students will learn. It’s a proactive tool that builds a bridge between your instructional goals and your students’ understanding.
Ultimately, this foundational stage isn’t about creating a rigid script. It’s about building a clear vision that actually allows more room for creativity and lets you respond to your students in the moment. When you know your destination, you can confidently navigate any detours that come your way.
Writing Clear and Actionable Learning Objectives
If your lesson plan is a roadmap, your learning objectives are the destination. It’s easy to write vague goals like, “students will learn about the solar system.” But that’s like saying, “let’s just drive west for a bit.” You’ll see some things, but you have no clear idea where you’re going or when you’ve arrived.
Clear, actionable learning objectives give your lesson direction. They are the single most important part of focused teaching, telling you, your students, and even parents exactly what success looks like.
From Vague Goals to Specific Outcomes
The first step is to ditch fuzzy words. Verbs like “understand,” “learn about,” or “appreciate” feel good to write, but they’re impossible to measure. How do you see understanding? How do you grade appreciation? You can’t.
Instead, use strong, action-oriented verbs that describe something you can actually observe. Think about what you want students to physically do to prove they’ve learned something.
Let’s transform a couple of common vague goals:
Vague Goal: Students will learn about the American Civil War.
Actionable Objective: Students will be able to identify three key causes of the Civil War and explain their significance in a short paragraph.
Vague Goal: Students will understand fractions.
Actionable Objective: Students will be able to correctly add two fractions with unlike denominators and simplify the result.
See the difference? This simple shift moves the focus from what the teacher intends to do (teach) to what the student will be able to do (demonstrate). It creates a concrete benchmark for success.
Using Bloom’s Taxonomy for Deeper Learning
Not all learning is the same. Memorizing a date isn’t the same as analyzing a historical document. To ensure your lessons challenge students at different cognitive levels, you can lean on a classic framework like Bloom’s Taxonomy.
This framework organizes thinking skills into a hierarchy, from simple recall to complex creation. Using verbs from different levels helps you build a well-rounded lesson that pushes students beyond just memorizing facts.
By selecting verbs from different levels of Bloom’s Taxonomy, you’re not just teaching facts; you’re intentionally cultivating critical thinking skills. This simple practice ensures your lesson plan promotes both knowledge and intellectual growth.
Here’s a quick breakdown with some action verbs to get you started:
- Remembering: Can students recall basic facts? (Verbs: Define, List, Name, Repeat)
- Understanding: Can they explain ideas or concepts? (Verbs: Classify, Describe, Explain, Discuss)
- Applying: Can they use the information in a new way? (Verbs: Choose, Demonstrate, Implement, Solve)
- Analyzing: Can they draw connections among ideas? (Verbs: Compare, Contrast, Differentiate, Organize)
- Evaluating: Can they justify a stand or decision? (Verbs: Argue, Defend, Judge, Support)
- Creating: Can they create a new product or point of view? (Verbs: Design, Assemble, Construct, Develop)
You don’t have to hit every level in every lesson. But if you find yourself stuck in the “Remembering” zone, try picking a verb from a higher level like “Applying” or “Analyzing.” It almost always leads to a more engaging experience for your students.
Putting It All Together: The SMART Framework
Once you have an action verb, a great way to stress-test your objective is to run it through the SMART framework. It’s a simple acronym that ensures your objective is practical and well-defined.
- Specific: Is it crystal clear what students will do?
- Measurable: How will you know they’ve done it?
- Achievable: Is this realistic for the time and resources you have?
- Relevant: Does this matter for the larger unit goals?
- Time-Bound: By when should they be able to do this? (Usually, “by the end of the lesson.”)
Let’s test our Civil War objective: “By the end of the 45-minute period, students will be able to identify three key causes of the Civil War and explain their significance in a short paragraph.“
- Specific? Yes. It says exactly what to identify and how to explain it.
- Measurable? Yes. You can count the three causes and read the paragraph.
- Achievable? For the right grade level, this is a solid goal for a 45-minute lesson.
- Relevant? It’s fundamental to any unit on the Civil War.
- Time-Bound? Yes. “By the end of the 45-minute period.”
When your objectives are this clear and actionable, the rest of your lesson plan falls neatly into place.
Designing Activities That Spark Engagement
You’ve defined your objectives, so you know your destination. Now comes the fun part: planning the actual journey. This is where you shift from the “what” and “why” to the “how,” crafting experiences that will make your learning goals come alive.
A truly great lesson is more than a lecture and a worksheet. It’s a living, breathing experience that pulls students in and makes them active participants. The activities you choose are the engine that drives comprehension and ensures the learning actually sticks.
Aligning Activities With Objectives
Here’s the golden rule: every single activity must serve an objective. If you can’t draw a straight line from what a student is doing to what they are supposed to be learning, then it’s just busywork. This alignment is what separates a fun but pointless game from a genuinely powerful learning moment.
For example, if your objective is for students to analyze the main character’s motivations, a simple vocabulary quiz won’t cut it. You need an activity that forces them to analyze something.
- Objective: Students will analyze the main character’s motivations in Chapter 3.
- Weak Activity: A multiple-choice quiz on plot points.
- Strong Activity: A “think-pair-share” where students debate the character’s most important decision and back it up with evidence from the text.
This direct link ensures every minute of class time has purpose.
An engaging activity isn’t just about being fun; it’s about being functional. The best activities make the learning process itself the reward, seamlessly blending student interest with the lesson’s core objectives.
Building Your Instructional Toolkit
To keep students hooked, you need to move beyond traditional lectures. Having a diverse toolkit of instructional strategies lets you pick the perfect approach for any given objective. It’s about having the right tool for the job.
It’s helpful to distinguish between your overall strategy and the specific tasks students will do. The strategy is your “how,” and the activity is the “what.”
| Instructional Strategy vs Learning Activity | ||
|---|---|---|
| Element | Definition | Example |
| Instructional Strategy | The overarching teaching method or approach you use to deliver content and facilitate learning. It’s the “how” of the lesson. | Cooperative Learning: Designing a lesson where students work together in small groups to achieve a common goal. |
| Learning Activity | The specific, hands-on task that students complete to engage with the material and practice a skill. It’s the “what” they do. | Think-Pair-Share: A specific task where students think about a prompt, discuss it with a partner, and share with the class. |
Understanding both helps you build a more dynamic and effective lesson plan.
From Classic Strategies To Modern Twists
Here are a few powerful strategies you can pull from your toolkit:
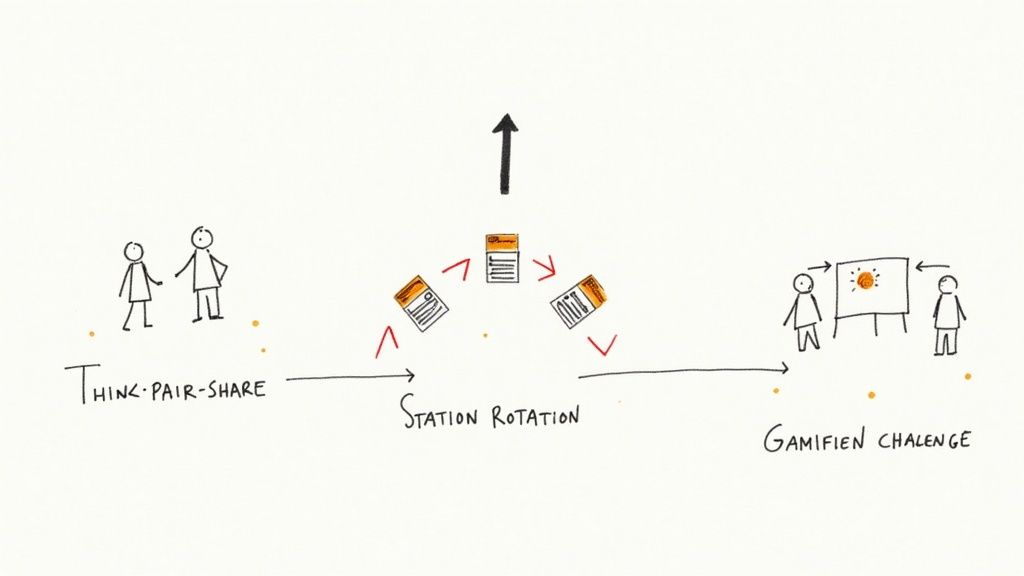
- Think-Pair-Share: A classic for a reason—it’s incredibly versatile. You pose a question, give students a quiet moment to think, let them discuss it with a partner, and then open the floor for group discussion. It encourages deeper thought and ensures every student gets a voice.
- Station Rotations: Break your lesson into smaller, focused activities and have students rotate through them in small groups. One station could be a hands-on experiment, another a collaborative puzzle, and a third some independent reading. This keeps the energy high and is a fantastic way to differentiate.
- Inquiry-Based Projects: Instead of just giving students the answers, pose a juicy question or a real-world problem and let them investigate. This approach builds critical thinking skills and gives them a real sense of ownership.
- Gamified Challenges: Bring in elements of game design—points, friendly competition, progress bars—to make learning feel more like play. This could be a review game on a platform like Kahoot! or a more complex challenge where students “level up” by mastering new skills.
If you want to dive deeper, check out these interactive training methods. The key is always to pick the strategy that best fits your learning objective and your students.
Sequencing Your Lesson For Maximum Impact
The order in which you do things matters. A well-sequenced lesson has a natural rhythm, like a good story, with a clear beginning, middle, and end.
One of the most reliable structures is the “I Do, We Do, You Do” model of gradual release:
- The Hook (“I Do”): Start with something that grabs their attention—a shocking statistic, a thought-provoking question, or a short video. This is where you introduce the concept and model the skill yourself, thinking aloud so they can see your process.
- Guided Practice (“We Do”): This is the heart of the lesson. Students try the new skill with your support and immediate feedback. This is the perfect time for think-pair-share or small group problem-solving.
- Independent Application (“You Do”): Now, it’s their turn to apply what they’ve learned on their own. This is the real test—the moment they prove they’ve hit the objective.
This sequence provides the scaffolding students need to build confidence and move toward true independence. It also helps with classroom management by keeping the lesson moving logically.
The demand for high-quality, shareable lesson plans is global. Open educational resources (OER) are booming—for example, Population Education, a provider of free lesson plans, saw its materials downloaded over 1.2 million times since 2022. This is especially critical in developing nations, where an estimated 45% of teachers rely on OER, highlighting a worldwide shift toward collaborative teaching strategies.
Checking for Understanding in Real Time
So, you’ve planned the perfect activity. It’s engaging and directly hits your learning objective. But how do you know if it’s actually working? Are your students really getting it, or are they just nodding along?
This is where assessment becomes a conversation, not a final verdict.
By building quick, low-stakes checks into your lesson, you get an instant read on where your students are. This is the secret to responsive teaching—knowing exactly when to slow down, offer a different angle, or move on.
Formative Assessment: Your Secret Weapon
Formative assessments are quick, informal checks you sprinkle during the learning process. Think of them as taking your students’ temperature. They’re low-pressure, usually ungraded, and give immediate feedback to both you and your students.
Weaving these into the natural flow of your lesson is a game-changer. Instead of waiting for a quiz to find out half the class is lost, you can spot misconceptions the moment they appear and adjust your teaching on the fly.
Quick and Practical Check-In Techniques
Here are a few battle-tested techniques you can slip into any lesson plan. They require almost zero prep and give you maximum insight.
- Whiteboard Check-Ins: Give every student a small personal whiteboard. Ask a question, and on the count of three, everyone holds up their answer. In five seconds, you can scan the room and see who’s on track.
- Fist to Five: This is a fantastic non-verbal poll. Ask students to show their level of understanding with their fingers: five means “I could teach this to a friend,” while a fist means “I am totally lost.”
- Think-Pair-Share: As you walk around listening to pairs discuss a concept, you get an unfiltered peek into their thought processes.
These simple methods make assessment an active part of the lesson.
By making assessment a continuous and informal dialogue, you create a classroom culture where it’s safe to be unsure. Students learn that misunderstanding isn’t a failure, but an essential part of the learning journey.
The Power of the Exit Ticket
If there’s one formative assessment to add to your toolkit, it’s the exit ticket. It’s simple, fast, and incredibly revealing.
An exit ticket is a short, focused prompt that students answer in the last few minutes of class. The goal is to get a quick snapshot of what they learned, what’s still fuzzy, or what they thought about the lesson.
Designing Effective Exit Tickets
A great exit ticket is short and ties directly to the day’s learning objective. Here are a few ideas:
- The 3-2-1:
- 3 things you learned today.
- 2 questions you still have.
- 1 thing you found most interesting.
- Solve This: Give them one problem that reflects the skill you just taught. (e.g., “Add these two fractions: 1/3 + 1/4.”)
- Define in Your Own Words: Ask students to explain a new vocabulary word or concept without using their notes.
A quick review of the exit tickets gives you priceless intel for planning tomorrow’s lesson. You’ll know immediately if you need to review, pull a small group, or if everyone’s ready to move forward.
Summative Assessments That Truly Measure Mastery
While formative checks are for learning, summative assessments are of learning. These are the bigger, often graded assignments at the end of a unit—like projects, essays, or final exams. Their job is to evaluate whether students have mastered the objectives.
When planning your summative assessment, always circle back to your objectives. If your goal was for students to “analyze the author’s use of symbolism,” a multiple-choice test on plot points won’t cut it. A much better fit would be a short essay where they have to back up their analysis with evidence.
By thinking about assessment from the very beginning, you create a powerful feedback loop that supports every learner.
Planning for Every Learner in Your Classroom
No two students walk into your classroom with the same background, skills, or learning style. This diversity is also one of the toughest parts of teaching. A one-size-fits-all lesson plan will almost always leave some students behind while not quite challenging others.
This is why differentiation isn’t just an education buzzword; it’s the core of creating lesson plans that actually work. It’s the art of tailoring your instruction to meet individual needs, ensuring every student can access the material and show what they know. The good news? It doesn’t mean you have to create 30 different lesson plans.
It’s about being flexible and offering different paths to the same learning destination.
Three Ways to Differentiate Your Lesson
Thinking about differentiation can feel overwhelming, but it really boils down to three manageable areas. By making small, intentional adjustments, you can reach a much wider range of learners.
Content (What they learn): This is about adjusting the information students work with, not the core objective. For a science lesson on ecosystems, some students might read a grade-level text, while others could watch a video with subtitles or explore an interactive diagram. Same goal, different entry point.
Process (How they learn): This focuses on the activities students do to make sense of the content. You could offer tiered assignments with different levels of complexity, use flexible grouping, or provide graphic organizers for students who need more structure.
Product (How they show what they know): This is a game-changer. It’s about giving students different ways to show they’ve mastered the objective. Instead of a standard written test, could a student create a podcast, design a poster, or build a model? Offering choice empowers students and lets them play to their strengths.
Making small tweaks in these areas can have a huge impact on student engagement and success.
Practical Strategies for Your Next Lesson
Let’s move from theory to what this actually looks like. The key is to build these options directly into your lesson plan from the start, so you’re prepared for every learner.
Differentiation is not about lowering the bar; it’s about building different ladders to help every student climb over it. By providing flexible pathways, you maintain high expectations while honoring the unique journey of each learner.
Imagine a history lesson where the objective is to “explain the primary causes of the American Revolution.”
Content: You might have a core reading passage, but you could also offer a simplified version with key vocabulary highlighted. For visual learners, you could link to a short documentary.
Process: A tiered assignment works well here. Tier 1 might ask students to list three causes. Tier 2 could ask them to explain those causes in their own words. Tier 3 could ask them to rank the causes by importance and justify their reasoning.
Product: Instead of only accepting a written paragraph, give them a choice. Maybe they can create a comic strip, record a one-minute video, or draw a mind map that visually connects the causes and effects.
These aren’t entirely separate lessons; they are just different pathways leading to the same learning objective.
Leveraging Flexible Grouping for Targeted Support
One of the most powerful tools in your differentiation toolkit is flexible grouping. This just means strategically arranging students into different group structures throughout a lesson. The “flexible” part is crucial—students should never be stuck in the “low group” all year.
Here are a few ways you can use it:
- Partner Work: Pair up students with complementary skills for a specific task.
- Small Homogeneous Groups: Briefly pull together students struggling with the same concept for a quick mini-lesson.
- Small Heterogeneous Groups: Mix students of different ability levels for collaborative projects where they can learn from each other.
- Independent Work: Don’t forget this one! Give students time to work alone when they need to focus deeply.
When you plan for these different groupings from the outset, you create natural opportunities to provide targeted support right when it’s needed most.
Reflecting and Refining Your Teaching Craft
The lesson planning cycle doesn’t end when the bell rings. The most effective educators treat each lesson not as a final performance but as a first draft. They use reflection as a powerful tool for continuous growth, turning today’s classroom experience into tomorrow’s improved lesson plan.
This process doesn’t need to be a monumental task. It’s about the simple habit of taking a few moments after class to think critically about what just happened. The goal is to capture your immediate thoughts while they are still fresh.
A Framework for Quick Reflection
To make this manageable, focus your thinking with a few key questions. Carve out five minutes to jot down honest answers—either in a notebook or directly on your lesson plan.
Answering these questions consistently gives you invaluable data:
- Student Engagement: Where did you see genuine excitement? At what point did students start to drift?
- Lesson Pacing: Did the lesson flow well, or did you feel rushed? Were there parts that dragged on longer than expected?
- Biggest Challenge: What was the single biggest hurdle? Was it a confusing instruction, a technical glitch, or a concept that didn’t land?
- Objective Mastery: Based on your observations and quick checks, did students actually meet the learning objective? How do you know?
The simple act of jotting down a few notes—like “Activity B took too long” or “Re-teach exponents to the back table group”—is the most effective professional development you can give yourself. It turns each lesson into a stepping stone.
This practice transforms your lesson plan from a static script into a dynamic, living document. Over time, these small reflections compound, allowing you to fine-tune your strategies, better anticipate student needs, and build a library of lessons that have been tested and refined in your own classroom.
Frequently Asked Questions About Lesson Planning
Even with the best templates, questions pop up when you’re in the thick of lesson planning. Let’s tackle some of the most common ones.
How Long Should a Lesson Plan Be?
There’s no magic number. A good lesson plan is exactly as long as it needs to be to guide you through the class with confidence.
For an experienced teacher, a few bullet points on a sticky note might be enough. For a newer teacher, a substitute, or a formal observation, a more detailed, multi-page document is better. The goal is always usefulness, not hitting a specific page count.
The best lesson plan isn’t the longest one; it’s the one that empowers you to teach with confidence and adapt to your students in the moment. Focus on creating a tool that serves you, not one that just checks a box.
What Is the Most Common Mistake?
The biggest mistake is trying to cram too much into a single lesson. It’s a classic pitfall: over-planning activities without realistically thinking about transition times, questions, and the natural flow of a classroom.
This often leads to rushing through the most important parts, like guided practice or a solid closing summary. My advice? Always build in a few minutes of buffer time. It’s better to have an extra five minutes for discussion than to run short and skip the wrap-up.
How Can I Make My Lesson Plans More Flexible?
The secret to flexibility is building in options from the start. Plan your core activity, but also have a simple backup or extension activity ready.
Think in “if/then” scenarios while you’re planning:
- For early finishers: “If students finish early, they can start the challenge problem on the back of their worksheet.”
- For time shortages: “If we’re running short on time, we’ll skip the full group share-out and move to the exit ticket.”
This proactive thinking prepares you to adapt to the classroom’s actual energy. It turns unexpected moments from stressful scrambles into smooth, intentional pivots.
Ready to streamline your video creation for educational content? With LunaBloom AI, you can generate engaging videos from text in minutes. Create tutorials, explainers, and course materials with customizable avatars and voice cloning to bring your lesson plans to life. Transform your teaching at https://lunabloomai.com.